If you’re a guitar player, ever since you held your first guitar, you’ve been on the seemingly never-ending search for the BEST possible tone.
Yet every time you think you’ve nailed the perfect tone on the guitar amp, it doesn’t sound as good when playing on a live stage, and the main reason is because the amp is not being miked and equalized correctly.
It’s no secret that having the best possible sound is the most critical part of the show, and one thing that can help you achieve that is knowing how to mic a guitar amp.
If you want the quick, short answer on how to mic a guitar amp, here it is… use a microphone such as the Shure SM57, place it on a short stand and make sure the mic’s head is one to three inches away from the grill and pointing directly to the speaker. If you want a mellow tone that emphasizes the mid and high frequencies, place the mic’s head at the center of the speaker. To minimize the higher frequencies and get a deeper, fatter, warmer tone, place the mic closer to the speaker’s edge.
For a more in-depth explanation, keep reading today’s article, as we’ll cover this topic in more detail. Let’s get started.
Why Do You Mic a Guitar Amp?
There are several reasons why you would want to mic your guitar amp. The biggest and most important reason is to achieve a mellow, balanced front house sound, capture the guitar’s full essence, and take advantage of the main PA system.
However, to dial in the best sound, it’s essential to use the right microphone, know how best to position it, and equalize it correctly.
Back in the day, guitar players and sound engineers would spend hours identifying the correct amp settings, getting the right microphones, and positioning them correctly. All this was done in a bid to produce good quality sound for that perfect performance.
Players should, however, understand that there’s no single surefire way to mic a guitar amp and that the sound output has to enhance the performance and not the other way round.
Today’s mics are designed in such a way that they can capture sound in every detail. The human ear can hear frequencies ranging from 20Hz to 20kHz. A good mic should capture the full spectrum of a guitar to produce the best desirable sound for the listeners.
Let’s look at the different factors you need to consider to achieve your guitar’s full potential.
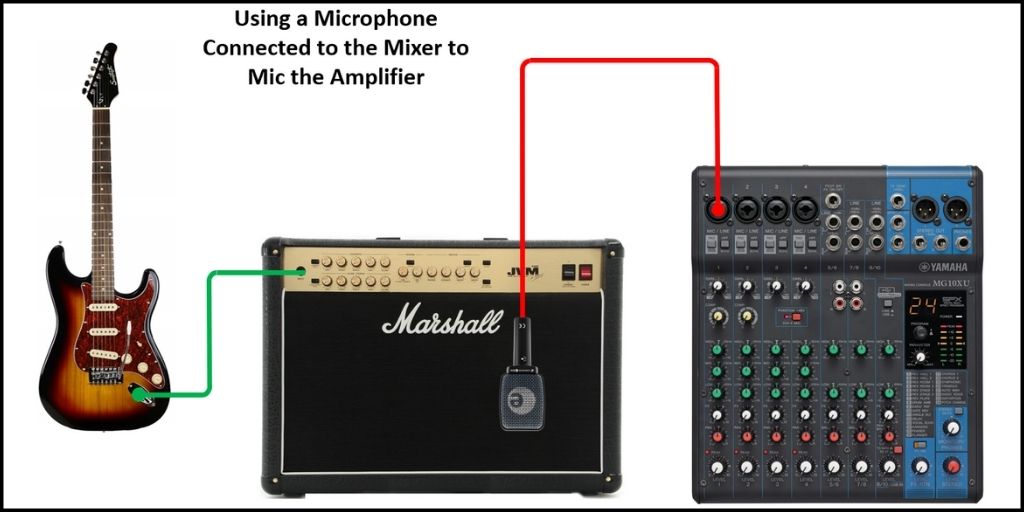
What Type of Microphone Delivers the Best Sound When Miking a Guitar Amp
We could go on and on about choosing the right microphone, but before we talk about which type might be better than the other, we have to get familiar with them.
The key thing to understand is that not all microphones are created equal. Each one has its advantages and disadvantages depending on the transducer that’s inside of it. The way the transducer works will tell you more about the type of mic you’re using.
When a microphone’s transducer is designed, it has specific patterns that dictate from which direction it captures or rejects sound.
These pickup patterns are called polar patterns, and there are several of them, but the most commonly used are cardioid, supercardioid, and hypercardioid. To learn more about the different microphone polar patterns click the link.
Now let’s delve deeper into how the three most popular types of mics, namely dynamic, condenser, and ribbon, can be used to mic a guitar amp.
Dynamic Microphones
Dynamic microphones are very common, and most of them have a cardioid polar pattern, which means they are unidirectional. They only capture sound directly in front of them and reject noises from the sides and rear.
This characteristic makes them the most viable solution for live gigs where all sorts of unwanted noises can bleed into the main mix messing up the performance.
Out of the three types of mics, dynamic mics are the most recommended for use when miking guitar amps.
They are not particularly sensitive to loud sounds and can handle the sound coming out of a guitar or bass amp.
They’re also extremely durable and can handle drops and bumps, unlike condenser or ribbon mics.
The best part is that they are very affordable and sound really good, which is definitely a plus.
Condenser Microphones
Condenser microphones are very sensitive to sound and are characterized for picking up the most subtle nuances in sound.
They are available in more polar patterns and can pick up very high frequencies, producing crisp, clear sound. This is why they are generally used in recording studios or controlled environments.
The first thing to understand about condenser microphones is that they can be used to record guitar amps, but feedback is a big issue in live situations where the signal has to be monitored and played back.
They are also more sensitive to loud sounds, so you’ll need to be careful with your guitar amp volume.
Extremely loud situations can potentially cause damage to the membrane, and you don’t want that to happen.
Generally speaking, condenser mics are more sophisticated than dynamic mics, and for that reason, they tend to be more expensive.
Ribbon Microphones
Of the three mics, ribbon microphones can produce warm, organic, and vintage sound.
They are the most fragile mics around, so you’ll need to be extremely careful when handling them.
They have a figure-8 polar pattern, which means they are very sensitive to sound from the front and back but completely deaf to sound from the sides.
However, the biggest downside to ribbon mics is that they can’t easily isolate the source of your sound. This is not ideal in live sound situations or untreated rooms with all sorts of bouncing frequencies.
That said, pairing up a ribbon microphone with a dynamic microphone is the best way to capture the sound from your guitar amp, as they will deliver the classic, 60’s, and 70’s era vintage guitar sound.
When to Use Each Type of Microphone
Generally speaking, dynamic and some ribbon microphones are excellent for miking up guitar amps during live performance. At the same time, condenser mics tend to deliver better results in recording studios and controlled environments.
Keep in mind that condenser mics will also deliver a bright, crisp sound that is not typical in electric guitar. This is why they are often used for miking acoustic guitars with metal strings, as their sound is much brighter than the electric guitar.
Similarly, dynamic and ribbon microphones can be paired with loud instruments with mid to low frequencies, while condenser microphones work better with quieter instruments with higher frequencies.
This isn’t a static rule though, in the end, your personal taste will be the determining factor.
In some cases, you could mix and match microphones to get the perfect sound when miking guitar amps for live sound.
Best Position for Placing the Mic
Here comes the most critical part – how best to position a microphone in front of the amp.
This is very important because the sonic output directly relates to where you place the mic in relation to the amp’s speaker.
There are two things to consider in this scenario: distance and angle at which the mic will face the amp.
1. Distance Between The Mic and Speaker’s Cone
This may come as a surprise, but even an inch difference in distance can significantly impact the tone produced.
The most recommended place to put the mic is directly in front of the speaker’s cone. That’s because this position gives you the most vivid representation of the guitar amp’s tone.
But the most confusing part is which part of the speaker’s cone the mic should face. The answer isn’t as straightforward, and here’s the reason.
The closer you move the center of the speaker’s cone, the more high ends and high mids you’ll get in the guitar’s tone.
The more you move away from the center of the speaker’s cone, the more bottom ends and lower mids you’ll get. And if you place the mic at either edge of the speaker cone, it will pick up a muffled and bassy tone.
If you have two mics, you can place them in two different positions to get a more rounded tone. This works perfectly well if there’s only one guitar player in the band.
If you have a dynamic mic, it’s recommended to position it one to three inches away from the speaker’s cone. If you place it too far, you may get a sound that’s “distant,” and the mic might even pick up other background noises that you don’t want.
If you have a condenser mic, you should put it further away from the grill, mostly because it is more sensitive and you want to avoid distortion. Ideally, you should place it about two to six inches away from the speaker’s cone for you to get the right tone.
I would recommend having both the condenser and dynamic microphones for that fuller, warmer sound, or a combination of a ribbon and a dynamic mic for a vintage mellow sound.
2. Angle Between The Mic and Speaker’s Cone
Aside from distance, the angle at which the mic faces the speaker also has an effect on tone. If you position your mic directly in front of the amp’s speaker (perpendicular) and notice that the tone is a bit harsh, then the mic is picking up too many higher-ends and higher-mids.
Positioning the mic at an angle from the cone of the speaker can help correct that. All you have to do is move the mic closer to the edge of the speaker.
To do this, start by placing your mic directly in front of the speaker’s cone (at 90 degrees) then slowly angle it (towards 45 degrees) until you find that ‘’sweet spot’’ where the tone is smooth and even.
As you move outside the 90-degree angle, you’ll start to notice a slight drop in the high-ends. The bottom-ends are not affected by changing the angle of the mic.
As mentioned earlier, if you want that muddy tone, you’ll need to move the mic further away from the center of the speaker’s cone.
Best Microphones for Miking Guitar Amps for Live Sound
The are several microphones that are excellent for miking guitar amplifiers for live sound, but the top five are:
- Shure SM57 – Budget-friendly option delivering balanced tone accentuating high frequencies
- Sennheiser e609 Silver – Easy to install, balanced sound, budget-friendly
- Sennheiser e906 – Great overall tone offering a three-position switchable presence filter
- The Audix i5 – Designed for instruments delivering an accurate sound reproduction
- Beyerdynamic M160 – Overall winner. It delivers excellent bass response, warm mid-ranges, and silky-smooth highs combined to produce a unique vintage sound.
The Shure SM57
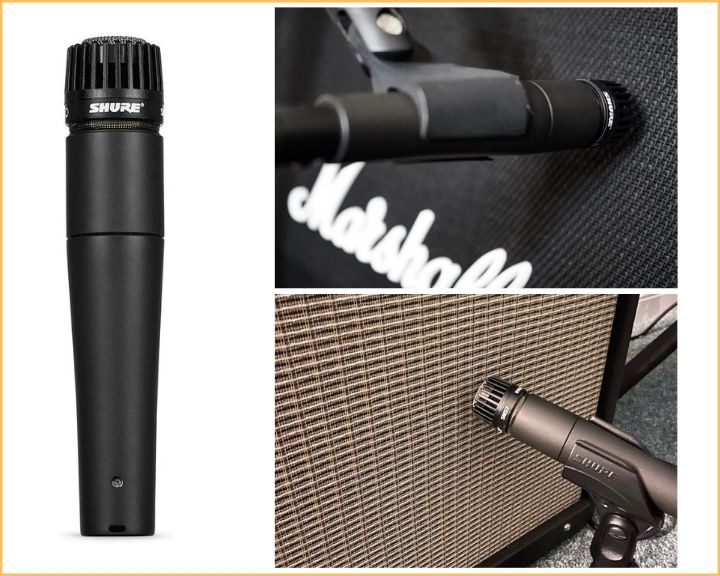
The industry standard and the most recommended mic to use is the Shure SM57. It’s the most popular choice by far for live sound, and there is a good reason for that.
It has an impressive frequency response of 40 Hz to 15,000 HZ and fully captures the essence of the guitar’s tones for the best possible sound.
From guitar, drums, and bass to vocals and even saxophones, this microphone can be used to mike practically everything.
With regards to durability, it is incredibly hardy and can take quite a beating. It is also resistant to weather conditions.
It has a cardioid polar pattern, which means it picks up sound that’s directly in front of it and rejects unwanted noises coming from the sides and rear.
Sennheiser e609 Silver
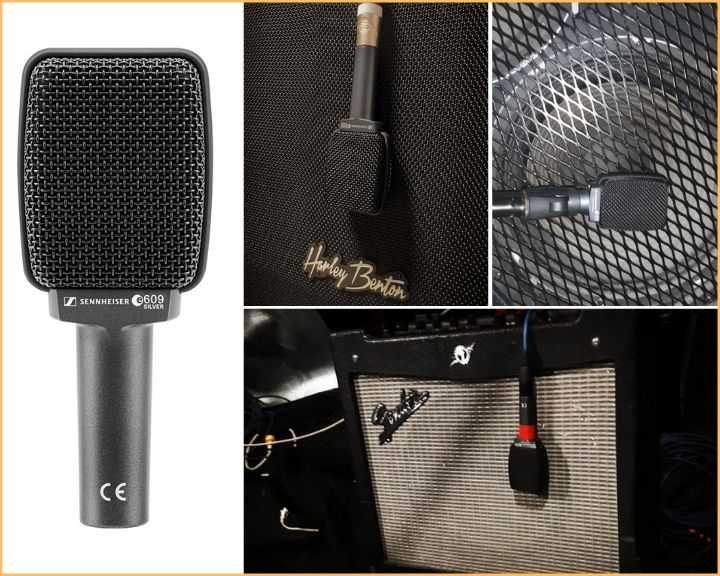
As one of the leading microphone manufacturers, Sennheiser offers a couple of excellent options that are tailored for miking guitar amps, with the e609 being an affordable option that delivers outstanding results.
The e609 Silver is a dynamic mic with a supercardioid polar pattern, which means that it has a tighter pickup angle than cardioids doing a better job at rejecting sound from the sides.
The frequency response goes from 40 Hz – 15,000 Hz, and it offers a relatively flat response curve between 100 Hz to 1500 Hz with a -10 dB boost between 1500 Hz to 4500 Hz.
In simpler terms, what this means is that it will pick up the sound as accurate as it sounds on the amp, with a slight boost on the lower-high frequencies. The sound captured by this mic is true to the original sound.
Other features worth mentioning are: it comes with a rugged metal body with an advanced shock-mount design for the transducer to minimize handling noise and a hum compensating coil to reduce noise in the audio signal.
Another cool design feature of this microphone is that you can hang it on the guitar amp for stand-free performance.
Sennheiser e906
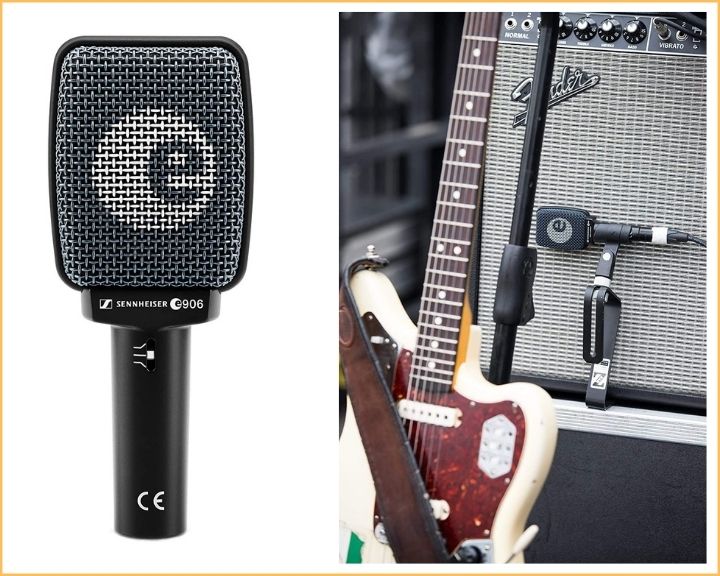
The e906 is a step up from the e609 Silver. This dynamic, supercardioid mic was specially designed for miking guitar amplifiers.
It features a full sound response and swift attack with a flat-shaped head, making it ideal for miking amp faces with an extra-resistant reinforced metal body to ensure durability for years to come.
With its three-position switchable presence filter, you can quickly change the pickup characteristics between bright, moderate, or dark tone.
Just as with the e609, this mic can hang on the guitar amp, so you won’t need a stand to use it.
Its frequency response is between 40 Hz – 18,000 Hz. The response curve is relatively flat between 200 Hz and 2500 Hz. Depending on the presence filter selection, you can boost or decrease frequencies between 1500 Hz and 6000 Hz.
What I am trying to say is that with this mic, you’ll get a more natural, authentic sound when miking your guitar amp. But, if you feel that you need a small boost or decrease in the lower high frequencies, all you have to do is change the switch position, and there will be a small frequency correction to deliver a tone that suits your needs.
The Audix i5
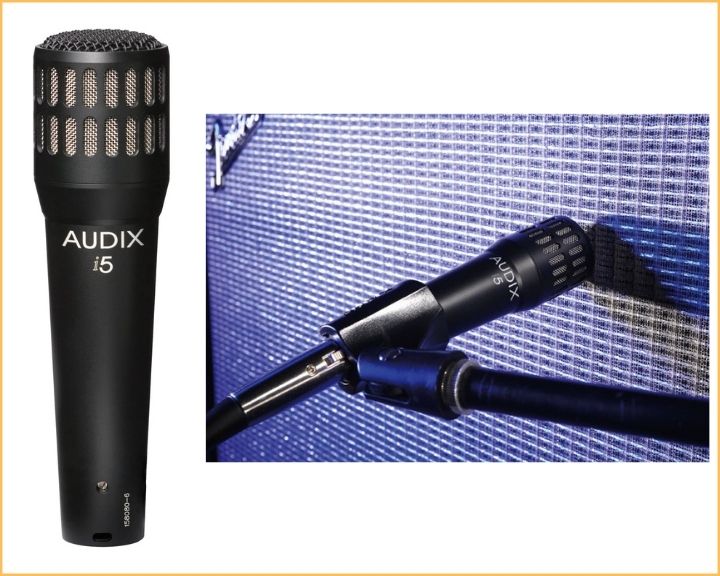
The Audix i5 is a dynamic instrument microphone designed and built in the USA with the highest quality control standards. It is specifically tailored to be used for stage and studio applications.
Thanks to its cardioid pickup pattern, it helps reject feedback providing you with more isolation control.
When it comes to accurate sound reproduction, the i5 excels because it is equipped with a very low mass diaphragm, translating into a more natural sound reproduction.
Its comprehensive frequency response ranges from 50 Hz to 16,000 Hz, providing crisp, clear, natural tones that don’t require much equalization.
Positioning this microphone is very easy thanks to its small, compact size. Compared to the Sennheiser models, the only drawback is that it needs a small stand to place its head in front of the speaker cabinet.
Another great thing about the i5 is the durability. It is manufactured with a precision cast zinc alloy body, dent-resistant steel grill, durable black E-coat finish, and gold plated XLR connector
Beyerdynamic M160
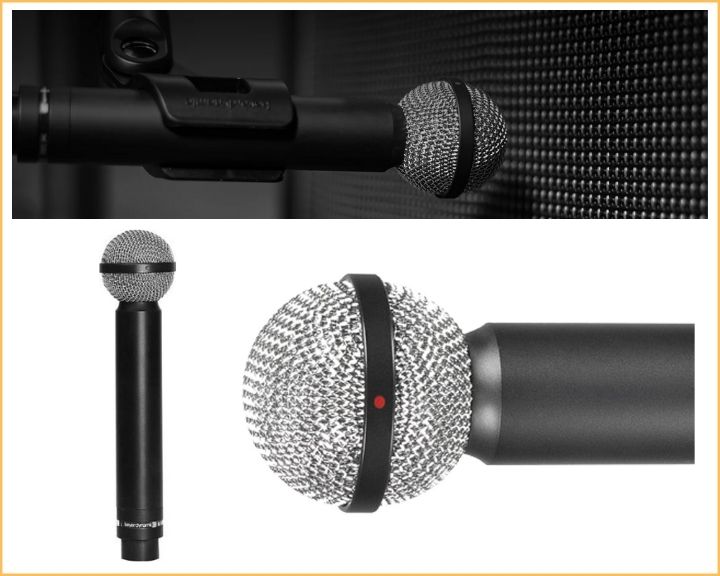
The M160 from Beyerdynamic is an excellent ribbon microphone. It was designed considering all the drawbacks of a regular ribbon mic and improved every detail to deliver the best natural true-tone of what is placed in front of it.
It is a dynamic, hypercardioid microphone, and it comes with two pure aluminum ribbons diaphragms installed inside the capsule!
One of the drawbacks of ribbon mics is that they have a figure 8 pickup pattern, which tends to be a problem when miking instruments in live events, as they pickup sound from the front and back.
This is not the case with the M160. It offers a very tight hypercardioid pickup angle, which makes it a must-use microphone if you want to get classic vintage sound when miking guitar amps without the drawbacks of regular ribbon mics.
One of the best features of this mic is its characteristically warm and natural sound. It will be hard to find another mic in this price range that delivers such a warm and mellow sound. It provides an excellent bass response, warm mid-ranges, and silky-smooth highs combined to produce an exceptional vintage sound.
The frequency response is between 40 Hz – 18,000 Hz, and its response curve is as flat as it can get between 100 Hz and 2000 Hz. From 2000 Hz to 8000 Hz, there is only a boost of 2 dB, making this mic a perfect option to mic a guitar amp for live sound or in a recording studio.
Sound Sample
In Short
- If you want a deeper, fatter sound, position the microphone towards the edge of the speaker. If the sound gets too bassy, slightly move it towards the center of the speaker cone.
- Instead, if a warmer smoother sound is what you are looking for, position the microphone at the center of the cone to emphasize the mid and high frequencies.
- Make sure the mic’s head is pointing straight to the speaker. In other words, it needs to be perpendicular to the protective grill. If you want to test different sound variations, Begin with the mic pointed at a 90-degree angle towards the speaker’s cone, and slowly change the angle until you find that ‘’sweet spot.’’
I usually say there’s no right or wrong method, experiment until you find what works for you. Have fun while at it!
