Let’s face it, the speakers that come with TVs sound anemic to say the least. It doesn’t matter if it’s a 32” LCD or the latest 77” OLED TV; the included speakers are not designed to deliver a cinematic, immersive sound experience.
Thanks to soundbars and home theater systems, you can significantly improve the sound experience with your TV. Speaker bars are more affordable than home theater systems, plus they are way easier to set up and deliver an immersive sound experience.
In today’s post, I will explain three simple ways of how to connect a soundbar to a TV, so let’s get started.
How to Connect a Soundbar to a TV – Three Easy Methods
Connecting a speaker bar to a TV is a straightforward process. The first thing you need to do is figure out which method you want to use. There are three easy ways to achieve this:
- Using an HDMI cable – Best Option
- Connecting it with an Optical cable – Second Best Option
- By using a red and white cable (RCA cable) – Use this method as a last resort
Let’s explore each one in more detail.
Connecting a Soundbar to a TV using an HDMI Cable
The easiest and best way of connecting a soundbar to a TV is by using an HDMI cable. HDMI stands for High-Definition Multimedia Interface, and it’s a type of audio/video connection that can transmit uncompressed and compressed video and audio data in digital form.
This type of connection is the current industry standard for connecting multimedia equipment digitally, delivering lossless video and audio quality.
These Are the Requirements When Using an HDMI Cable for the Connection
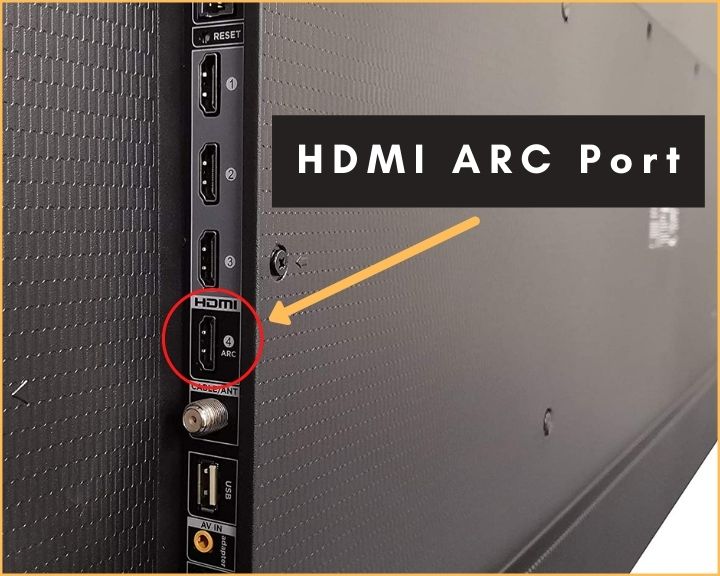
For connecting a speaker bar to your TV, you need to make sure that both your TV and soundbar have an HDMI port that is ARC capable (see picture below for your reference).
ARC stands for Audio Return Channel and is a special function of HDMI certified cables in which you can send and receive audio signals through the same cable reducing the number of connections between your TV and external speakers or home theater system.

One of the best features of HDMI ARC is that you can connect all your components like Roku, cable box, etc., to any ARC capable device, and then use only one cable to send the video and audio between devices. Most TVs and soundbars come with one HDMI ARC port for this purpose
Steps for Connecting a Speaker Bar to a TV Using an HDMI Cable
Before starting the setup, make sure to connect your other components like your Roku, cable box, Blu-Ray, or DVD player to the back of the TV or the soundbar. Doing this will help you test your setup with all of your equipment to make sure it works well.
- The first thing is to make sure that the TV and speaker bar are both off.
- At the back of the TV, locate the port labeled “HDMI ARC.”
- Once you have located the port, connect one side of the HDMI certified cable to this port. There’s only one way that the cable fits correctly, so make sure you match up the plug in the correct way and push it until it goes all the way in.
- At the back of the soundbar, locate the HDMI ARC port. Proceed to connect the other side of the HDMI cable coming from the TV to this port.
- With everything connected, turn the devices on to continue with the configuration.
- In most cases, with newer model TVs, as soon as it detects something connected to the HDMI ARC port, it automatically routes the audio signal to that port and disables the TV’s speakers. If it doesn’t happen automatically, you would have to do it manually.
- If you have a Samsung TV, open the system’s menu, then go to “Sound.” Next, select “Speaker List,” then select “Receiver (HDMI)”
Depending on your TV’s brand, the menu will be slightly different, but the idea is the same. You need to locate the audio section, turn off the TV’s speakers and send the audio signal through the HDMI ARC port.
We are using a Samsung TV for this tutorial to walk you through, but the same principle applies to any other brand. If in doubt, consult your TV’s instruction manual for the step-by-step process of routing the audio signal to the HDMI ARC port with your particular TV.
- Next, you want to make sure you select the correct input on your soundbar. Usually, it provides several inputs for connecting more than one device. There’s going to be a button on the soundbar’s remote or on the unit itself that says “Source” or “Input.” You’re going to press it until you select the correct input; in this case, select the one that corresponds to HDMI ARC.
- With the input set to HDMI, play some video on the TV. If everything is correctly set, you should hear the sound coming out of the speaker bar. Try raising the volume if you don’t hear anything.
- Select a different video source on your TV, let’s say your Apple TV, Amazon Fire, or cable box, and play something to make sure that it sounds good as well.
- That’s it; you have successfully connected a soundbar to your TV using an HDMI cable.
How to connect a Soundbar to a TV using an Optical Cable
The optical cable is another way used to connect audio equipment digitally. It uses a fiber optic cable and a laser to transmit and receive audio signals. It was introduced back in 1983 by Toshiba to connect audio devices.
If you don’t have the option of using an HDMI ARC for connecting your TV to the speaker bar, use the optical cable method, but if you do have the option of using HDMI ARC, I highly recommended it because it is much better than using an optical cable.
First, you have to start by hooking up your other components like your Roku, Apple TV, Amazon Fire TV, cable box, Blu-Ray, or DVD player to the back of the TV. This will help you test your setup with all of your equipment and ensure that it works well.
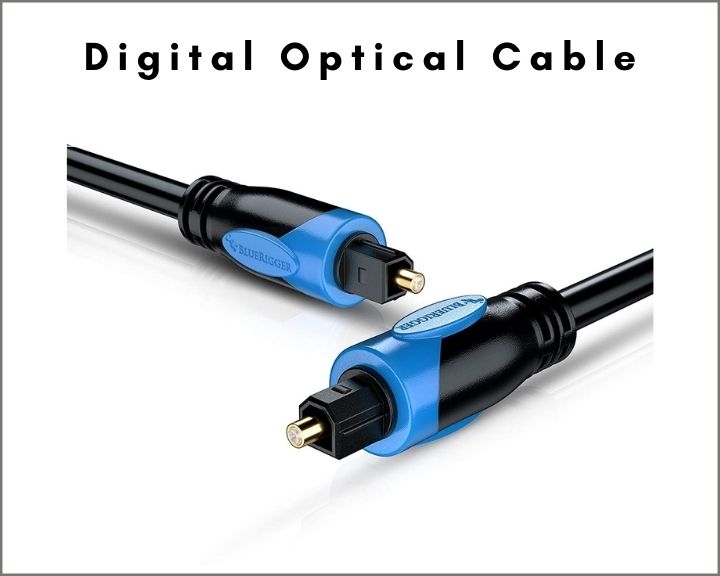
If you are not familiar with optical cables, the picture below shows you what it looks like. One end will connect to the TV and the other to the soundbar. Some manufacturers include an optical cable as part of the cable bundle.

Steps for Connecting a Soundbar to a TV Using an Optical Cable
Now that you have connected all your components to the TV, the following steps will walk you through the rest of the process.
- Make sure that everything is turned off before starting the setup.
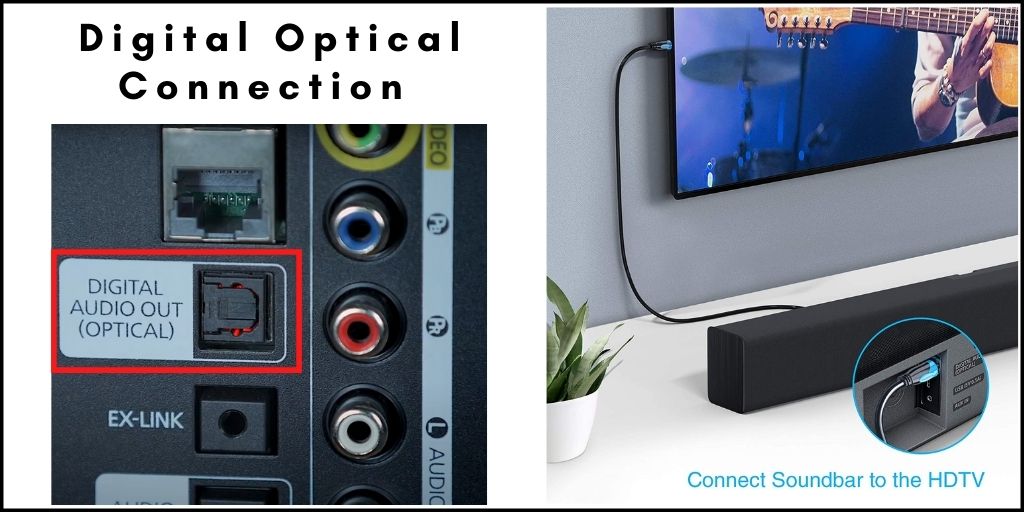
- The first thing you need to do is remove the small plastic covers on both ends of the cable. These little covers are used to protect the fiber optic connectors from dust. It is important to remove them because if you don’t, it won’t work. See the picture below for your reference.
- Now you’re going to locate the optical output on the back of your TV. It is usually labeled “Optical Out” or “Audio Out.”
- Plug one end of the optical cable to the back of the TV. There’s only one way that the cable fits correctly, so make sure you match up the plug in the correct way. Once the plug is in, you have to give it a little push to make sure it snaps into place. You’ll feel it lock into place once you push it in.
- At this point, locate the optical connector labeled “Optical Input” or “Audio Input” on the soundbar.
- With the optical cable connected, turn on the power on both units.
- You have to go into your TV’s system menu and locate the “Audio” or “Sound Settings” submenu for this step. You’ll see an option to turn off the TV speakers and send the sound through the optical output.
- If you have a Samsung TV, open the system’s menu, then go to “Sound.” Next, select “Speaker List,” then select “Audio Out/Optical.”

Each TV has a different menu layout, but the idea is the same. You need to locate the audio section in the menu, turn off the TV’s speakers and send the audio signal through the optical output.
In our example, we are using a Samsung TV to walk you through the process. Still, the same principle applies to any other brand. If in doubt, consult your TV’s instruction manual.
- Next, you want to make sure you select the correct input on the speaker bar. Usually, it provides several inputs for connecting more than one device. Find on the remote or the unit itself a button labeled “Source” or “Input” that you’re going to press until you see the correct input, in this case, Optical.
- Play something on the TV and if everything is correctly set, you should hear the sound coming out of the soundbar. Try raising the volume if you don’t hear anything.
- Select a different video source; let’s say your Roku device or Blu-ray player and test it to make sure that it works as well.
In some cases, you could use your TV’s remote to control de external speaker, especially if both devices are from the same brand. If not, you could check your TV’s manual to see if there is a way to program the remote to work with both of your devices.

Connection Method Using a Red and White Cable – RCA Cable
Another way to connect a speaker bar to a TV is with an RCA cable, sometimes referred to as the red and white cable. This works assuming that your television and external speaker supports RCA audio connections.
This method uses an analog audio signal between both units. Although it works for getting a better audio experience than with TV speakers, it cannot receive audio formats like Dolby or DTS.
RCA audio output is usually found in older generation equipment. The new generation TVs and streaming devices such as Roku, Amazon Fire, or Apple TV, are not compatible with analog audio connections like RCA anymore as they are being phased out and replaced by HDMI.
Use the RCA audio output connection as a last resort if HDMI ARC or Optical is not available.
Steps for Connecting a Soundbar to a TV Using a Red and White Cable – RCA Cable
Before we start, you need to have an RCA to RCA cable for making the connection.
- I always recommend having everything turned off before making any connection.
- In the back of the TV, locate the RCA “Audio Output” connector (red and white plugs).
- Take one side of the RCA cable and connect the red plug to the red connector and the white plug to the white connector to the back of the TV.
- On the speaker bar, locate the RCA “Audio Input” connectors in the back.
- Now, take the other side of the RCA cable and connect the red plug to the red connector and the white plug to the white connector.
- Turn both devices on to configure the TV so that the internal speakers are disabled and the audio signal is routed to the RCA output.
- If you have a Samsung TV, open the system’s menu, then go to “Sound.” Next, select “Speaker List,” then select “Audio Out.”
- Select the correct input in the soundbar and try playing something on the TV. Make sure to increase the volume in case you can’t hear anything playing.
Depending on your TV’s brand, the menu will be slightly different, but the idea is the same. You need to locate the audio section, turn off the TV’s internal speakers and route the audio signal through the “Audio Out” connector. If in doubt, make sure to consult your TV’s instruction manual.
Final Thoughts
Although TV’s speakers don’t deliver a good audio experience for watching movies, this can be easily fixed by installing a soundbar, and the best way to achieve it is by using an HDMI that is ARC capable.
If that’s not an option, the second-best option is to use an optical cable. Lastly, as a last resort, use the white and red cable (RCA) as long as is supported on your devices.
If in doubt, I recommend checking your TV’s manual for changing the sound setup on your TV. I hope this post was helpful to you.