When it comes time to set up equipment, it can be intimidating if you haven’t done it before. No worries, we’re going to show you how to hook up a subwoofer to a PA system with three different methods, so you can see that it’s a job you can easily tackle.
When doing a live sound subwoofer setup, we’ll first look at using an external crossover or PA management system. Then, we’ll take a glance at how to add a sub leveraging the active crossover that comes with any powered subwoofer, and lastly, by using a sub-mix. This is achieved with your mixing console by using the “Aux Send” or “Auxiliary Mix” option. Ready to get started?
How to Hook Up a Subwoofer to a PA System: Live Sound Subwoofer Setup
There are three methods to add a subwoofer to a PA system:
- Using an external crossover or PA management system
- Leveraging the active crossover that comes with a powered subwoofer
- By Setting up a Sub-Mix using the Mixing Console
Let’s take a closer look at each one of these options in more detail.
Method 1 – Using a Crossover or PA Management System
If you’re looking for an easy way to hook up a subwoofer to a PA system, this is the first method I’d go with, especially if setting up passive subwoofers. In fact, it’s the system that most rely on. It’s easy to set up, and it’s reliable. The idea is to feed the signal through, then break it into different frequencies, while sending them to the appropriate places.
With crossovers, you’ll have one of two options. Use the active one that most likely came with the powered subwoofer or opt for an outboard if you’d prefer more control. Crossovers come in differing variations, depending on how complex you want to get with 2, 3, and 4 ways systems.
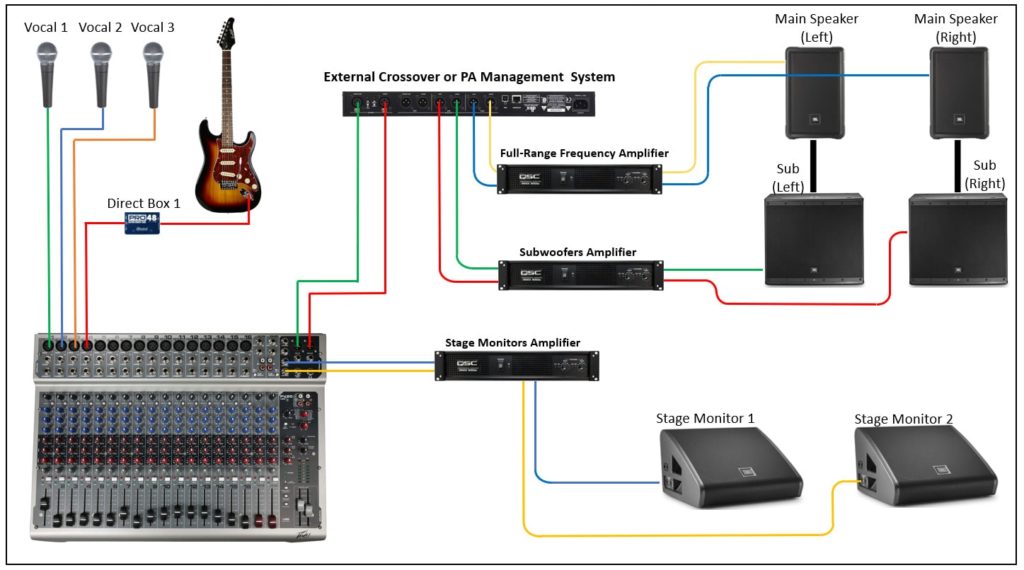
So, basically, you’re going to feed your full frequency signal into your crossover, and this then sends the different frequency signals to each speaker and your low frequencies to your subwoofer.
Diagram for Adding a Subwoofer Using an External Crossover
The following image is a diagram showing the signal flow and connections your need to make to add a subwoofer to your PA system using the external crossover method.

READ: Difference Between Active and Passive Speakers
Method 2 – Leveraging the Active Crossover that comes In a Powered Subwoofer
If you are using active speakers and subwoofers for your PA system set up, using the active crossover included would be the best way to add a sub to your live sound. This is not going to cost extra because the crossover is included inside the subwoofer.
Most active subwoofers come with an internal active crossover that you can use for your advantage. It allows you to connect the full range signal coming from the main outputs of the mixing console, and internally, it separates the frequencies that go to the sub’s power amplifier and the loop signal that goes to the tops.
Just to clarify, “tops” refers to the full-range powered speakers that usually go on top of the subwoofer’s cabinet.
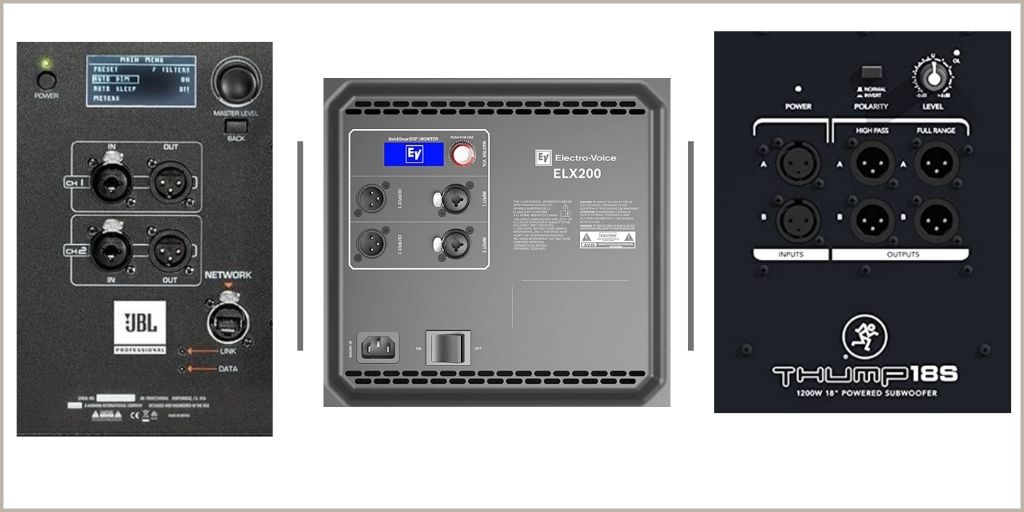
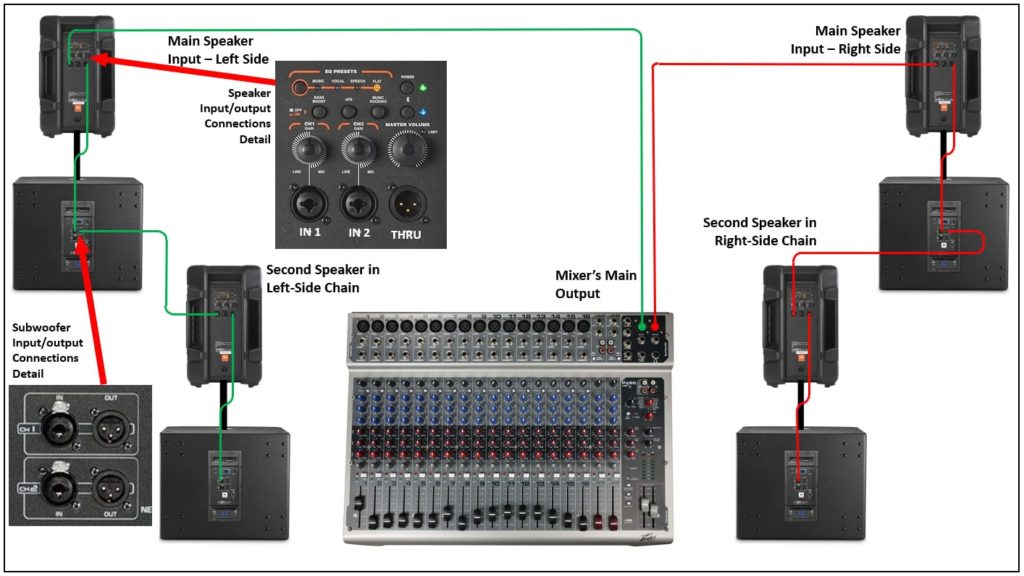
Adding a subwoofer to powered speakers by using the sub’s active crossover is very easy. All you have to do is connect the signal cable coming from the audio mixer to the subwoofer’s input channel. Then from the output loop, connect a cable to the full range speaker. Select the cutoff frequency you want, and that’s it.
I have dedicated a full article of the best powered speakers with their companion subwoofers. These speaker/subwoofer combos deliver exceptional quality, excellent sound, and are very easy to set up.
The following image is an example of the connectors you need to look for when adding an active subwoofer to your PA system.

Diagram for Adding a Subwoofer Using its Internal Crossover
I have also included a connection diagram to make it easier for you to follow the signal flow and have your PA system set up ready in no time.

READ: How to Daisy Chain Active Speakers
Method 3 – By Setting up a Sub-Mix using the Mixing Console
If you want more control over those low frequencies for extra bass and thump, you may like choosing which specific signals to send to the subwoofer. In this case, you’re going to opt for a sub-mix.
You’ll see the terms “Auxiliary Mix” and “Aux Send” used interchangeably. It’s just another expression, so don’t let that jar you when you’re learning how to hook up a subwoofer to a PA system. Different people use different words, but it’s all the same here.
Another reason people may choose this method of live sound subwoofer setup is the concern with muddiness. If there’s a problem with the mix or filters, and too much low is pumping through without the correct adjustment, the sound can get a little muddy, which basically means that the sound is not clear delivering weak harmonics, and a smeared time response.
Okay, ready to get started? Now, while you’ll most likely use method one, you may move around a lot and have a sound guy really involved in the mix, but that means you probably have engineers who focus on this. Otherwise, for simplicity’s sake, stick with the first method.
In this case, you’re going to feed your signal out to your subwoofer via the “Aux Send.” This is ideal when you have a lot going on, have a big ole mixer, and a lot of mics. This has to do with the frequency range of the different mics, voices, and instruments. With a lot going on at one time, this allows you to pull out and adjust only the areas needed going to the subwoofer.
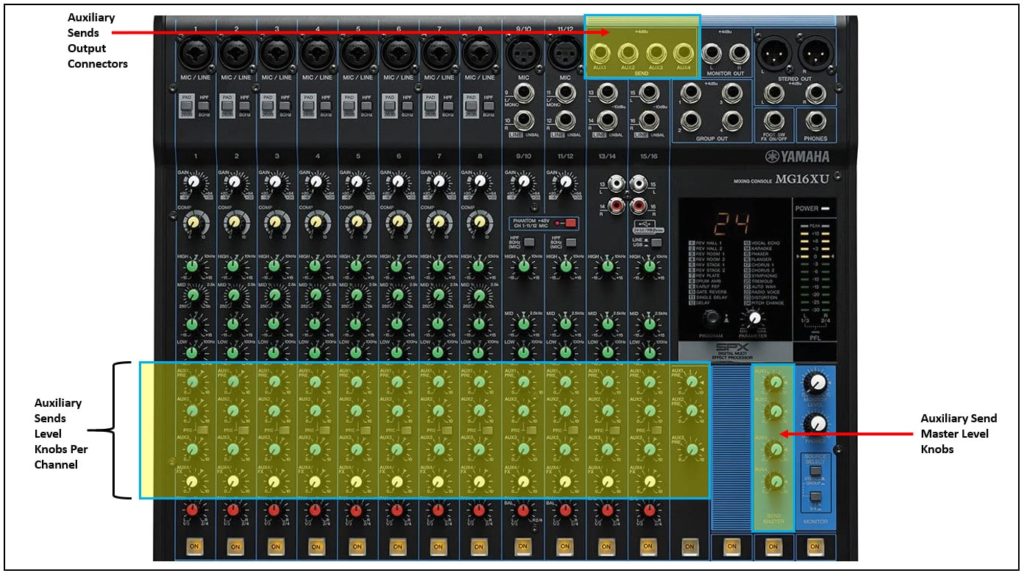
The image below shows you a typical analog mixer with the “Aux Send” highlighted for easier reference. Basically, you would connect a cable going from the “Aux Send Output Connectors” to the subwoofer’s input.
Then you would increase or decrease the Aux knob on each channel depending on which one you want to send to the subwoofer.
Lastly, there are “Aux Send Master Volume Control” knobs that increase or decrease the volume level for all of the selected channels.
This connection scheme gives you the most control over what goes to the subwoofer, helping you have a cleaner mix avoiding muddiness in the sound.

READ: Mixing Console Basics
Which method should you choose?
Choose the one that is more practical for you. If you have passive speakers, method 1 would be the best option. The reason is that with an external crossover, you would be able to divide the frequencies in Hi, Mids, and Lows, then send the corresponding frequency to each amplifier.
Instead, if you are using powered or active speakers, method 2 would be perfect for you. Just make sure that the subwoofer you purchase comes with an active crossover.
The third method works perfectly well if you need more control over which channels go to the subwoofer. That way, you get a cleaner mix avoiding any muddiness in the sound.
Please understand that the Sub-Mix method could work perfectly well either with an external or internal crossover. It just gives more flexibility and control over the signal path.
When Learning to Hook Up a Subwoofer to a PA System, Learn the Basics First
I suggest getting comfortable with the basics before jumping into everything else. Here’s why. Build your foundation, have something easy to rely on, and fall back on. Then, when your confidence has grown, you’re more used to working with your equipment, you can then expand and experiment from there.
Like anything, when you’re learning something new, learn the basics, know them inside and out, and build from there.
The following links are easy to read articles that explain the essential knowledge you need for setting up a PA system. I have also included some recommended PA systems that could make your setup easy, still delivering excellent sound.
READ: How to Set Up a Stage Sound System
READ: Public Address System Components – Everything You Need to Know
READ: How to Position PA Speakers
If you have any questions or comments, please let us know in the comments section below. Thank you for reading my blog.