In today’s digital age, it is very easy to search for your favorite music on Spotify, iTunes, or any other streaming service. Although those services have huge music libraries, there is a chance that you won’t be able to find the song you are looking for, especially if it’s an old song.
If you grew up in the 80s and 90s, you might have lots of cassette tapes lying around with some of your favorite music and special memories recorded on them. As with most analog formats, as they get older, the sound quality diminishes, that’s why it is a good idea to digitize them.
I this post, I will present a couple of methods for converting cassette tapes to digital formats. That way, you can save your beloved cassette collection with your favorite songs and memories. Let’s get started.

What You Need for Digitizing Cassette Tapes
Before getting started, there are a few things that you need to have for converting your cassette tape library to MP3 or any other digital format. You will need:
- Cassette tape deck with USB or Line Out; or a portable tape player such as Walkman or boombox.
- Audio interface (Optional).
- An Audio recording software. (Garage Band for Mac, or Audacity for Windows PCs).
- A desktop computer or laptop.
- The necessary cables for connecting the devices.
Steps for Converting Cassette Tapes to Digital
- Use a USB compatible cassette player or your existing one to connect it to the computer directly or through an audio interface to play each tape.
- Connect all devices.
- Record the incoming audio signal using Audacity.
- Split and edit the recorded tracks.
- Add metadata description to each track.
- Export digitized tracks to MP3 or any other digital format.
Methods for Converting Cassette Tapes to Digital
There are a couple of approaches you can take for transferring cassette tapes to digital. The first method is by using a USB-Capable cassette player, connect it to the computer, then digitize each tape using your favorite recording software.
The second method is by using your existing tape player connecting it to the computer via an audio interface. If you don’t want to spend any money buying an audio interface, connect your tape player directly to the input line of the sound card.
For both methods, you will need to have some type of audio recording software. If you have a Mac, it already comes with Garage Band, which can be used for recording audio sources. For Windows computers, you would need to install a recording software. I recommend using Audacity because it comes with all the features you need to get excellent results when digitizing cassette tapes.
In case you didn’t know, Audacity is a free, open-source program that can be used for recording, editing, and encoding any audio source. You can use it to record voice, instruments, for converting vinyl records to MP3, and of course, for converting audio cassettes to digital. Click the following link for a step-by-step guide on how to install Audacity on your Windows 10 computer.
Converting Cassette Tapes to Digital With a USB-Capable Cassette Player
If you don’t have a cassette player and need to get one for the sole purpose of digitizing your tapes, I recommend getting one that comes with a USB connection. This will make the process much easier because all you have to do is connect it to the computer, open the recording program, and start recording your tapes.
Here are a couple of examples of USB-capable cassette players, the Reshow USB Compatible Player, and the Teac W-1200 Dual Cassette Deck with USB (links to Amazon).
Follow these steps to convert cassette tapes to digital using a USB-Capable cassette player on a Windows PC with Audacity installed in it. The diagram below is for your reference.
1. Connect one side of the USB cable to the corresponding port on the cassette player and the other side to an available USB port on your computer.
2. Turn the device on and allow a few seconds for the computer to install the drivers. After the drivers install correctly, a confirmation will appear on a pop-up window on the lower right corner of your screen.
3. Open Audacity and select the cassette player’s interface as the input device from the drop-down menu. Check the image below for your reference.

4. Insert side “A” of the cassette tape, and make sure to rewind it to the beginning.
5. After you are ready, hit the record button on Audacity and press play on the tape player.
6. After side “A” is finished recording, press “Pause” on Audacity, and flip the tape to side “B.”
7. Press play on the tape player, then click on the “Pause” button again on Audacity to continue recording.
8. After you are done recording one tape, save the recorded audio as a project for editing it later. Click “File” >> “Save Project” >> “Save Project As…” then select the folder where you want to save the project you are working on.
9. The editing and exporting process is explained later in the article. I have dedicated a section only for explaining how to edit and export the recorded file.

Digitizing Cassette Tapes Using an Audio Interface
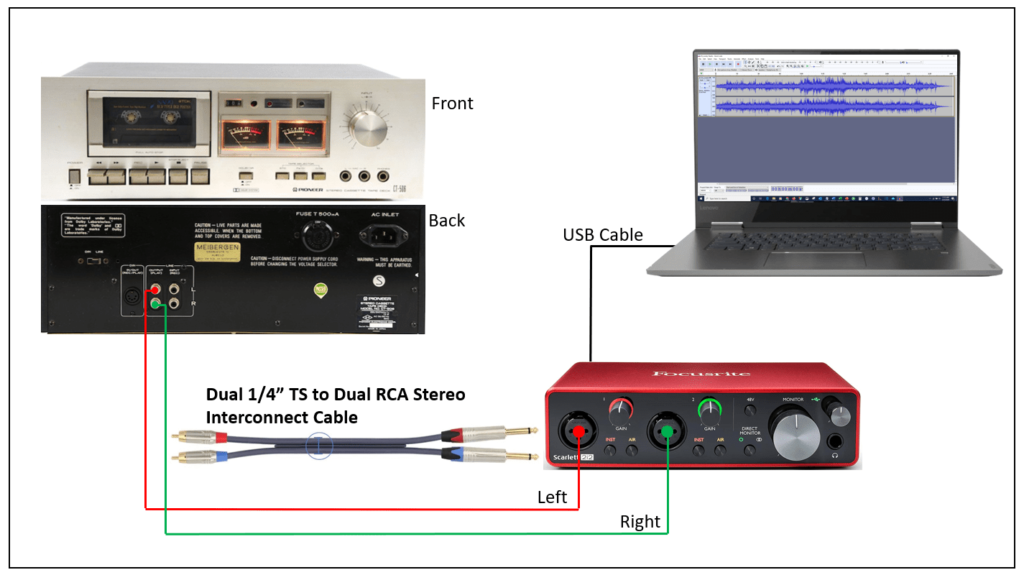
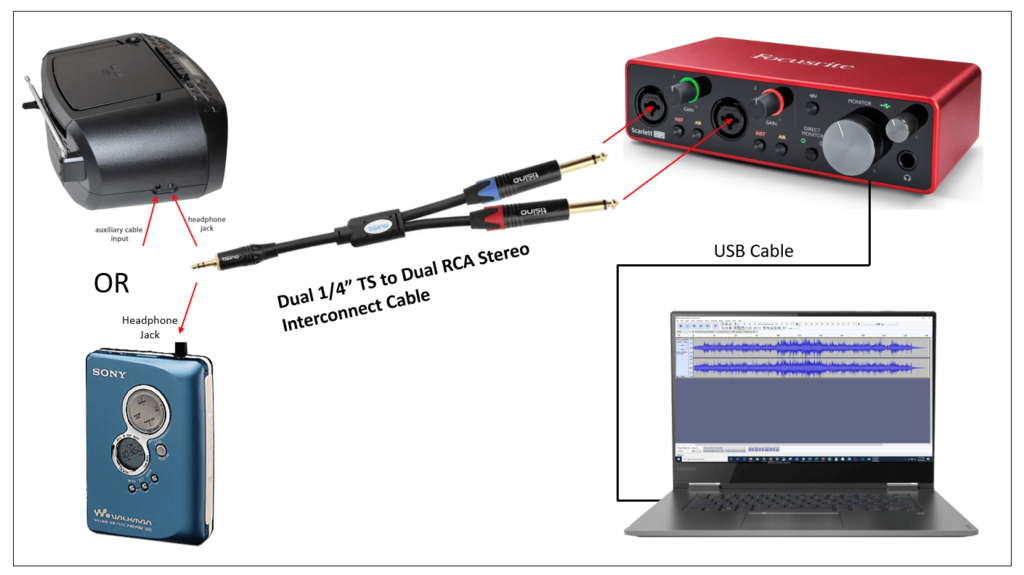
If you already own a cassette deck with RCA line out or a boombox with headphone out, you could use an audio interface to transfer your old tapes to digital. All you have to do is connect the tape player to the interface, then connect the interface to the computer to transfer the digital signal.
To connect your existing cassette deck to the audio interface, you would need a Dual 1/4” TS to Dual RCA Stereo Interconnect Cable (link to Amazon). If you have a boombox or Walkman, you could also use it, but in this case, you need to check that the boombox has a headphone out. If it does, you would need a 3.5mm stereo to Dual 1/4” TS interconnect cable to go from the boombox or Walkman to the audio interface.
To connect your existing cassette deck or boombox to an audio interface, follow these steps or the diagram below.
- Connect the RCA cable from the back of the cassette deck to the input of the interface. If instead, you decide to use a boombox, connect the 3.5mm stereo jack to the headphone out of the boombox, and one 1/4” TS to each input of the interface.
- Take the USB cable and connect one side of it to the back of the audio interface and the other to an available USB port on your computer.
- After the interface’s driver is installed, open Audacity and select it as the input device from the drop-down menu, just as the shown image above.
- Insert the tape you want to digitize, press the record button on Audacity, then press “Play” on the tape player.
- After the tape has been recorded, save the project, and edit it. Read the next section about how to split, edit, and export digitized files.
Digitizing Cassette Tapes by Connecting Directly to the Computer with no Interface
Another way to transfer tapes to MP3 is by connecting the cassette deck or boombox straight to the computer’s sound card input line. Use this method if you don’t want to invest in a USB-capable player or audio interface.
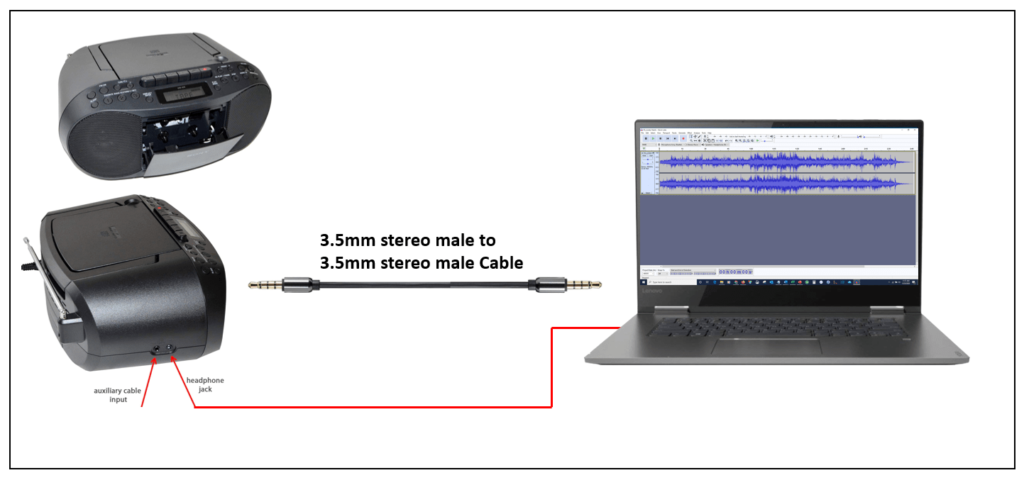
If your cassette deck has RCA line output, use a 3.5mm stereo to Dual RCA interconnect cable to connect between the tape deck and the computer. If instead, you want to use a boombox or portable tape player like a walkman, you will need a 3.5mm stereo male to 3.5mm stereo male cable to run between the boombox and the computer.
This method uses the computer’s sound card to digitize the audio and record it to Audacity. To connect the cassette player to the computer for recording, follow the steps and the diagram below:
1. If using a cassette deck, connect the RCA cable in the back. If using the boombox, connect the 3.5mm stereo jack to the headphone out.
2. Connect the 3.5mm stereo jack to the input line of your computer. If you have a laptop, the Line input is the same one you use to connect your headphones. In newer computers, as soon as you connect the cable, a pop-up window asks you to select the type of connection you want. In this case, we have to choose “Line In.”

3. If, when you connect the 3.5mm cable, no pop-up window appears, go to “Control Panel” >> “Hardware and Sound” >> “Sound.” In the new window that opens, select the “Recording” tab. Click “Line In” then click on “Set Default.” This procedure enables the audio port to be used as a Line-In input.

4. The next thing to do is open Audacity, and don’t forget to select “Line In” it as the input device from the drop-down menu, just as shown in the previous section.
5. If you decide to use this method, make sure to monitor the audio level that is coming into the computer by looking at the VU meter on the “Recording” window or Audacity. Never allow the sound level to clip.

6. Next, insert the tape in the player, hit the record button, and wait for the whole tape to be recorded.
7. Save the file, then split, edit, and finally export it to MP3.
How to Convert Cassette Tapes to Digital With no Computer
Maybe you want a more straightforward method for converting tapes to MP3 without going through all this process. The good news is that there are portable tape players that come with the feature of saving the tapes to MP3 on a flash drive. The bad news is that they are low-quality products and it’s possible that you won’t like the result.
Internally they have circuits that take the analog signal from the tape to digitize it, and then it saves it to MP3 on a flash drive. Next, you can take the flash drive, insert it to a computer, or connect it to your phone to transfer the files.
I don’t recommend taking this approach to convert your cherished cassette tapes to digital. Still, if you want to check them out, here are some examples of portable tape players that can transfer cassette tapes to a USB flash drive. The DIGITNOW Cassette Tape to Mp3 Converter, and the Pyle Cassette to MP3 Converter – USB Flash Drive (links to Amazon).
Split and Edit Recorded Tracks
After recording one full cassette tape on Audacity, it is still one track. You would want to split each track to save it as one file. By going back to the beginning of the recording, you would see a silence between tracks. The silence helps you identify where a song ends, and when the next one begins.
If the type of album is a live recording or a mixed tape where tracks fade into each other, you would have to listen to the recorded file so that you know where one song begins and ends.
To split tracks on Audacity follow these steps:
1. Locate the first silence after the first song and click on it. Click on “Edit” >> “Clip Boundaries” >> “Split.” Doing this is going to separate that track from the rest of the recording. Repeat this process for all the tracks in the recording.

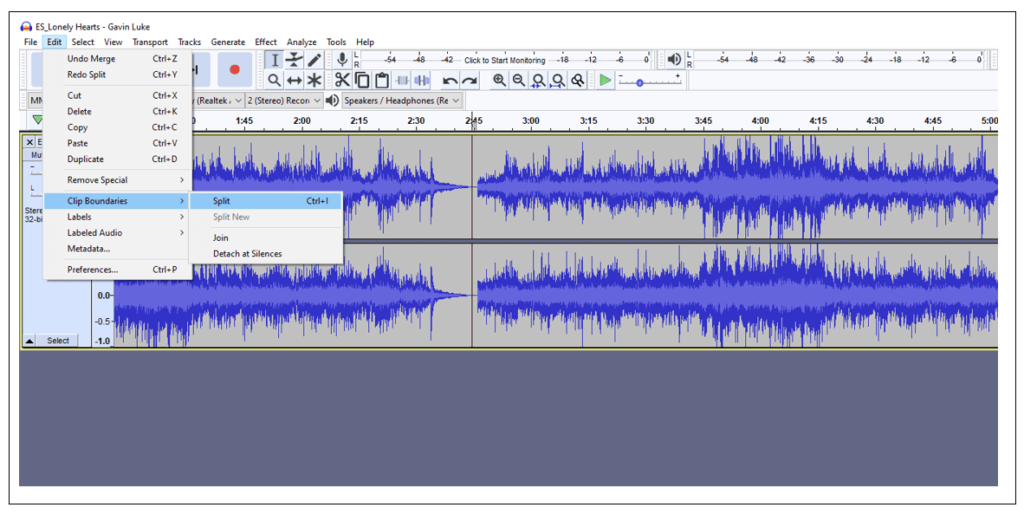
2. Double click on the first track you split and click on “Edit” >> “Copy.” Then click on “File” >> “New,” this is going open a new Audacity window. On the new window that opened, click on “Edit” >> “Paste.” Repeat the same process for all the tracks in the recording.
3. At this point, you have split the first track, and now you can edit it. For example, you could decrease the silence that appears at the beginning of the first track, or use tools such as “Noise Reduction” to reduce the hiss that is typical in cassette tapes.
4. To clean up the sound of the recorded track, double click the track to select it, then go to “Effects” >> “Noise Reduction…” Try different settings until you get one that you like the most and click “Ok.”
As explained in Audacity’s manual, “noise reduction is always a compromise because, on the one hand, you can have all the music and a lot of noise and, on the other hand, no noise and only some of the music. Try different settings on the “Noise Reduction (dB)” slider until you get the best compromise.”
Add Metadata Description to Each Track in the Album
Now that you have separated all tracks and edited them the way you want, I recommend adding metadata to each track. That way, files are easily searchable, especially if you have a vast music library.
To enter the metadata description for each track on Audacity, follow these steps:
1. Go to “Edit” >> “Metadata.”
2. On the new window that opens, enter all the information about that specific track.

3. After entering the data for the first song, you can save it as a template so that you don’t have to reenter the same information for each track.
4. To save as a template, click on “Save” under “Template.” On the window that opens, choose a location where to save the template so that you can recall it later for each track of the recorded tape.
Export Digitized Tracks to MP3 or Any Other Digital Format
With Audacity, you can export a project to different digital formats, including WAV and MP3.
The following steps explain how to export the digitized tracks to digital formats.
1. When you are ready to export your recorded tracks, double click the track to select it, go to “File” >> “Export” >> “Export Selected Audio.”
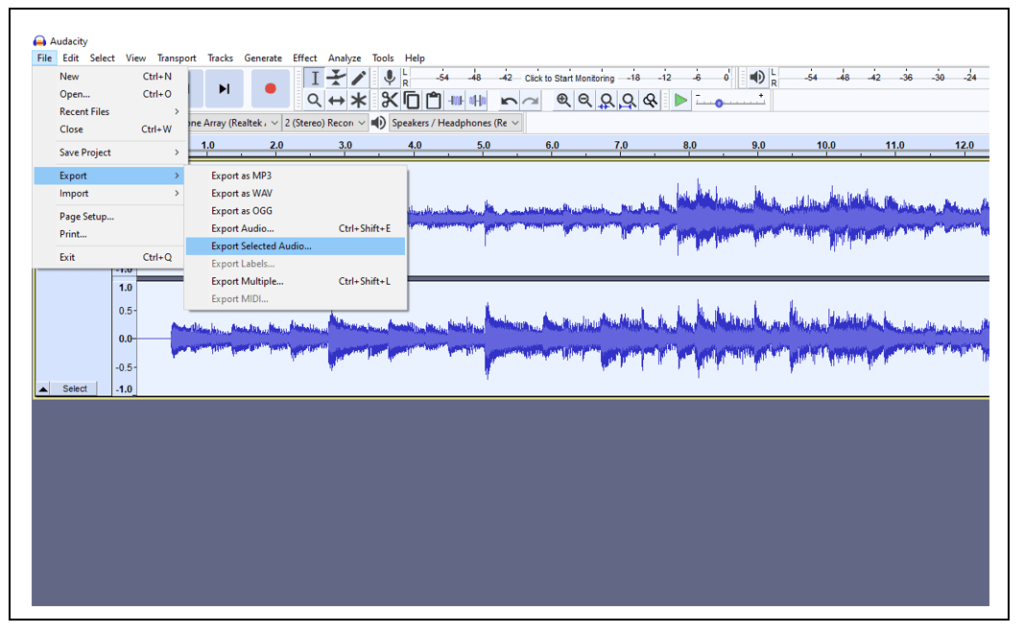
2. On the new window that opens, name the file with the title of the song. Select the “Encoding” you want. The default is Signed 16-bit PCM. If you want a better sound resolution, select Signed 24-bit PCM, but remember that the encoded files will be bigger.
3. Next, select the audio format you want. The most popular is MP3. If you decide to go with this one, select the one option from the different format options available. Just know that if you choose the highest quality, each file is going to be large, and if you have an extensive music library, you might need a few terabytes to store them.
4. After selecting the format option you want, click on “Save,” and the metadata window opens, select the template you saved previously to load it, and edit the information as needed. Click “Ok,” and the file is going to be converted to whatever digital audio format you chose.
Final Thoughts
I hope that this post is helpful to you for converting cassette tapes to digital. By converting your tapes to MP3 you can save them on your computer, smartphone, or portable media player. That way, you can take them anywhere you go. You could even store them on the cloud for easy access.
If you have any questions about this article, please leave a comment, I will get back to you ASAP. Thank you for reading my blog.