Vinyl records have been around since 1940, and it can be argued that records can deliver superior sound quality than modern digital formats. The reason is because vinyl is recorded in an analog lossless format that provides a wider effective dynamic range. Also, there is no sampling taking place while recording, rendering a more realistic and warmer sound.
Although vinyl produces better-sounding records, as with most analog recording forms, there are some drawbacks. They degrade over time, introducing noise and scratches to the sound. They are not portable and cannot be transported easily anywhere.
In today’s article, I present different options for converting vinyl records to MP3. That way, you can digitize your priceless record collection so that it is not degraded as years pass by. Plus, you can take your music anywhere, either on your phone or a portable MP3 player.
What You Need to Convert Vinyl to Digital Format
Before getting started, there are a few things that you need to have for getting the best results while transferring your LPs to MP3. You will need:
- Some vinyl record and Needle Cleaning Kit.
- A USB-capable turntable or audio interface with an external preamp.
- An Audio recording software.
- A desktop computer or laptop.
- All the necessary cables for connecting devices together.
Steps for Transfering Vinyl Records to MP3 or Any Other Digital Format.
- Clean and prepare each vinyl record to get the best possible audio for recording.
- Use a USB-capable turntable or audio interface with an external preamp to digitize the records.
- Connect all devices.
- Record the incoming audio signal using Audacity.
- Split and edit the tracks.
- Add metadata to each track.
- Export digitized tracks to MP3 or any other digital format.
Clean Vinyl Records to Get the Best Audio for Recording
If you have records that have been around for years, they likely have dust and fingerprints in the grooves. All the dirt accumulated over the years creates a static-like sound when it passes through the needle. You would want to minimize the static noise as much as possible before transferring the audio from the vinyl record to the computer, and to do that, you need to clean it.
There are different ways of cleaning a vinyl record. You could get a Vinyl Record Cleaner Kit that comes with all the necessary accessories, cleaning solutions, and instructions to get the best results possible.
Another way to remove dust and grime from the grooves is by using a Carbon Fiber Anti-Static Record Brush. Next, use a mixture of water and soft dishwashing soap to wash the record. Afterward, rinse thoroughly with water and, if possible, use filtered or reverse osmosis water instead of regular tap water. Ordinary tap water can have impurities; if you have hard water, it’s likely to be high in dissolved minerals such as calcium and magnesium. These minerals can find their way into the vinyl grooves, making it worse.
To dry the vinyl record, use a clean Lint Free Anti-Static Microfiber Towel or cotton cloth by applying even pressure in circular movements.
Even after brushing and washing the vinyl, some dust can still be present in the deepest grooves. When playing on the turntable, the needle can pick them up, and it would become dirty with dust and lint.
After one side of the record has been converted to digital format, make sure to clean the needle with a Carbon Fiber Anti-Static Stylus Brush before playing the other side of the record. This procedure will ensure that no dust is attached to the needle so that you can continue recording and be able to get good results.
Using a USB Capable Turntable or Audio interface With External Preamp to Convert Your Vinyl Records to Digital.
Some modern turntables are USB capable, meaning that internally they have an analog to digital converter, simplifying the process of converting vinyl records to MP3. These units also have a preamp that amplifies the signal to the ideal volume before digitizing it.
Some examples of USB-capable turntables are the Audio-Technica AT-LP60XUSB, Sony PS-LX310BT, House of Marley EM-JT000-SB, or the Audio-Technica AT-LP120XUSB (links to Amazon).
All of the USB-capable models mentioned in the previous paragraph are backward compatible with the Windows Operating system starting with Windows 7 all the way to Windows 11. So, if you decide to get any one of these, you should be ok when connecting it to your computer to convert your vinyl records to MP3.
Try to avoid cheaper models because, in most cases, it’s difficult to get replacement needles, and the overall build quality is not the best.
Another way to rip records to MP3 is by using an audio interface with an external phono preamp. Audio interfaces take any analog signal and convert it into a digital one.
If you have a classic turntable that uses a magnetic phono cartridge, connecting it directly to the audio interface will result in very low-volume recordings. This is why you need a preamp that could boost the signal enough for the audio interface to use it.
If you have a turntable and a preamp and don’t want to spend any money buying an audio interface, there is another option for you to transfer vinyl to MP3. All you need is a stereo RCA to 3.5mm male jack cable to send the signal from the preamp straight to the computer. Then use the Line-In input from the sound card to receive the analog signal and use your computer’s sound card to digitize the signal so that it can be recorded.
Connecting All the Devices to Convert Vinyl to MP3
This section will discuss the different ways you can connect a turntable to a computer to convert your vinyl collection to MP3. If you already own a turntable, start by checking the type of output connection it has.
Older turntables have an RCA output connection and a switch to select between Phono and Line. In case you don’t know, by choosing the Phono option, the turntable will output a very weak signal, and you would need a preamp. If instead, the turntable comes with a line-level output, the signal can be used by an audio interface for recording.
Using a USB Capable Turntable
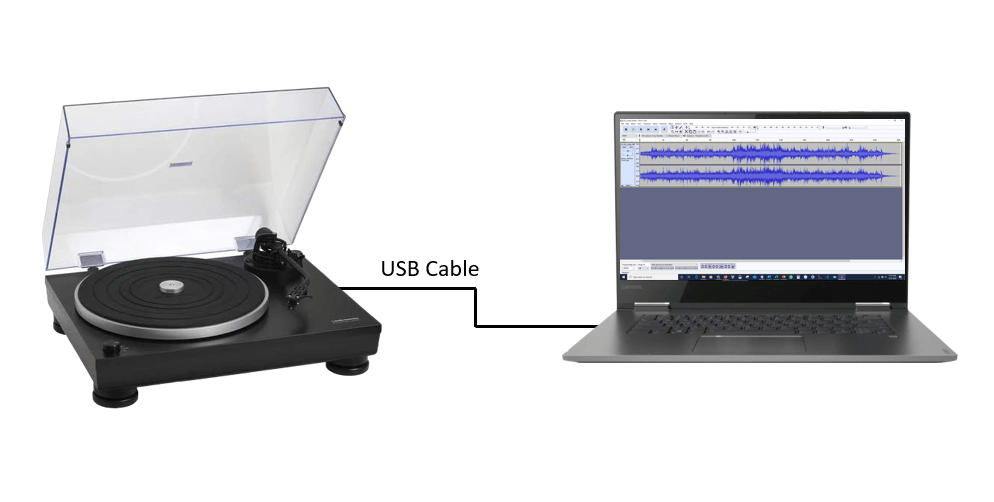
This is the easiest option to transfer LPs to digital format because all you need to do is connect the turntable to the computer using a USB cable, open the recording software, and start recording.
As explained previously, inside of it, is an analog to digital converter that outputs a digital signal that the computer uses to record the audio. Audiophiles argue that this is not the best option because USB turntables don’t deliver the best audio results.
I think audiophiles are right because most USB turntables use Analog-to-Digital (A/D) and Digital-to-Analog (D/A) converters that have a 16-bit/44.1 kHz or 48 kHz resolution. This audio resolution is low when compared to the ones an audio interface can deliver. The resolution of an audio interface is 24-bit/192 kHz providing a lossless audio resolution.
Although USB turntables don’t provide the highest audio resolution, they deliver good audio quality. Plus, they are very convenient, easy to use, and they get the job done. If you decide to go this route to transfer your LPs to MP3, make sure to choose a well-known brand, that way, the overall build quality will be better.
To connect a USB-capable turntable, follow these steps and use the diagram below for your reference:
- Connect the USB cable at the back of the turntable.
- The other side of the USB cable connects to the computer.
- Turn on the turntable and allow a few seconds for the computer to install the driver. After it installs, it will let you know with a pop-up message in the lower-right corner.
- Open your favorite recording software. In our case, we will use Audacity.
- Load the record you want to transfer to MP3, and hit the recording button on Audacity.
Connecting a Turntable to Audio Interface
Another way to convert vinyl records to mp3 is by connecting a turntable that offers a line-level output to an audio interface. If you have a turntable that comes with a switch to select between Phono or Line, make sure to switch it to Line. That way, the signal is set to line-level, and the audio interface can use it.
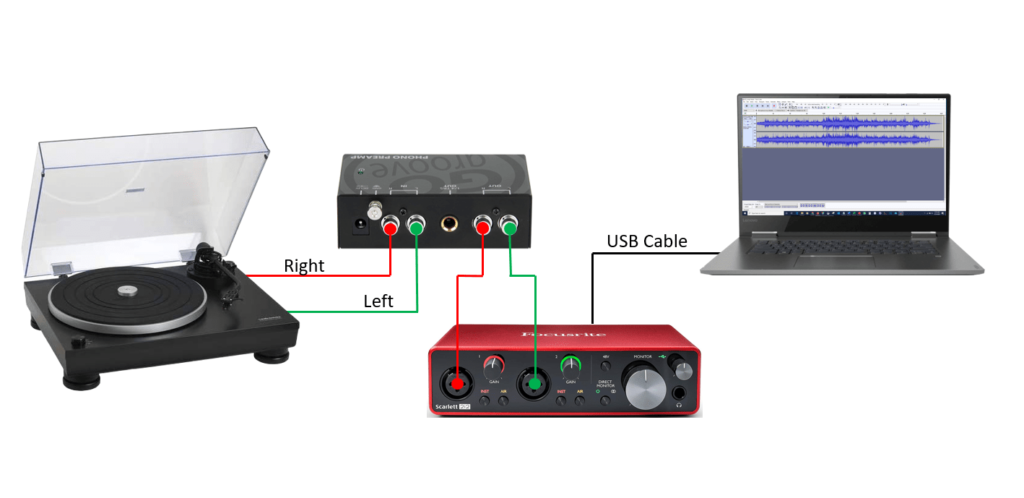
If your turntable only comes with Phono output, the signal will be too weak for an audio interface to use, and the recording will be useless. Use an existing preamp to connect between the turntable and the audio interface or if you don’t have one, get an external phono preamp (link to Amazon).
To connect a turntable with Line-Level Output, follow the steps and diagram below.
- Before connecting the equipment, make sure they are off.
- To connect the turntable to the audio interface, you need a Dual 1/4” TS to Dual RCA Stereo Interconnect Cable (link to Amazon).
- Connect the RCA side of the cable to the turntable and the 1/4” TS to the audio interface.
- Take the USB cable connected to the back of the audio interface and connect it to an available USB port on your computer.
- Turn all the equipment on, allow the computer to install the interface’s drivers, then open Audacity.
- Select your interface as the input device from the drop-down menu in Audacity.
- Perform a couple of short test recordings to see how the audio levels are. If the volume is too low on the test recording, try increasing it on the interface. Make sure not to allow the audio input levels to clip because it will sound distorted.
- After making the necessary adjustments to get the best volume, proceed to record the whole album to split the tracks later.
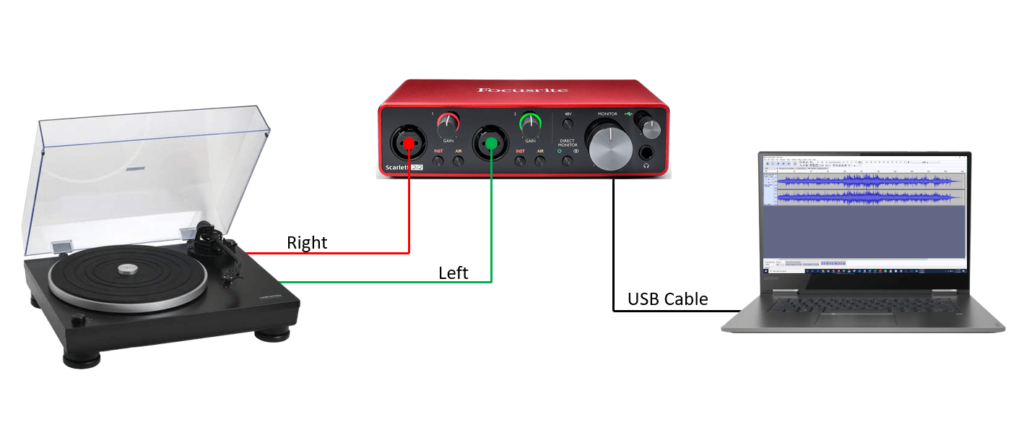
If you want to connect a turntable with Phono-Level Output, use an external preamp. The only difference, in this case, is that there will be a preamp connected between the turntable and the audio interface.
Follow the diagram below for your reference.
Connecting a Turntable to Computer Without an Audio Interface
If you want to know how to transfer vinyl records to MP3 without A USB Turntable or audio interface read on.
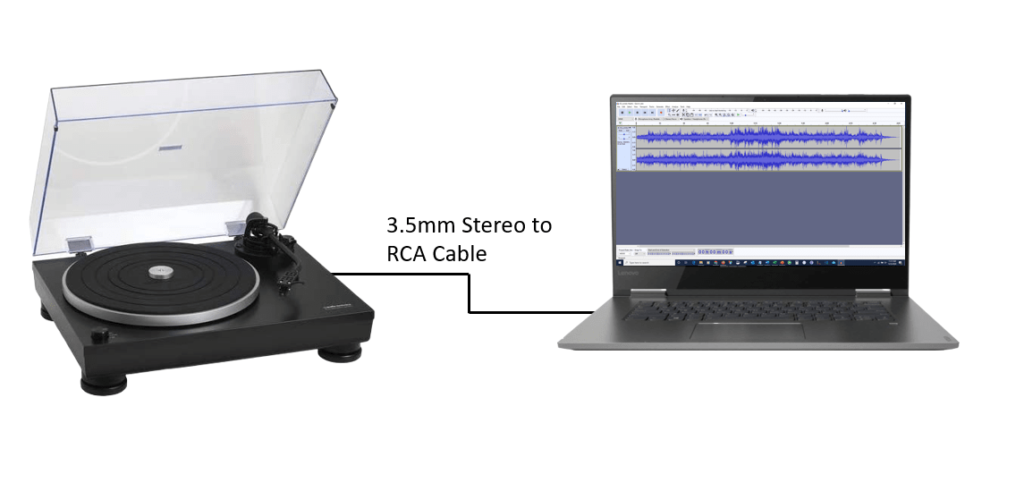
Let’s say you have a turntable that provides a Line-Level output, and you don’t want to spend any money getting an audio interface. You can still convert vinyl records to mp3 by connecting it straight to the Line-Input of your computer. All you need is An RCA to 3.5mm Stereo Jack cable like the one in the image below.
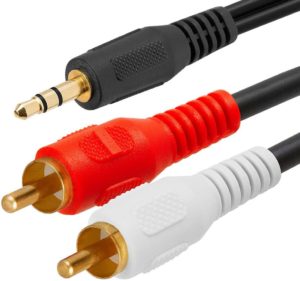
To connect the turntable to the computer, follow the steps and the diagram below:
1. Connect the RCA cable to the turntable, and make sure to select Line.
2. Connect the 3.5mm stereo jack to the input line of your computer. If you are using a laptop, the Line input is the same port where you connect the headphones. In newer model computers, a pop-up window asks you to select the type of connection you want as soon as you connect the cable. In this case, we have to choose “Line In”.
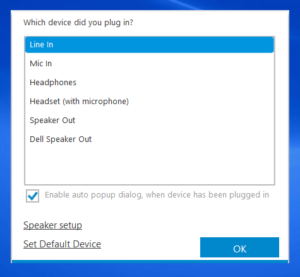
3. If, when you connect the 3.5mm cable, no pop-up window appears, go to “Control Panel” >> “Hardware and Sound” >> “Sound.” In the new window that opens, select the “Recording” tab. Click “Line In” then click on “Set Default.” This procedure will enable the audio port to be used as a Line-In input to connect the turntable.

4. The next thing to do is open your favorite audio recorder to start recording your vinyl records. I recommend using Audacity.
5. If you decide to use this method, monitor the audio level coming into the computer by looking at the VU meter on the “Recording” window. Never allow the audio level to clip.
Record the Incoming Audio Signal Using Audacity
After you have decided how you want to connect your turntable for recording, open Audacity to configure it. If you don’t have Audacity installed on your computer, read this article for a step-by-step tutorial on installing this excellent digital audio workstation.
After opening Audacity, click on the select recording device drop-down menu to select your device. If you are using a USB-capable turntable, select it here. If instead, you are using an audio interface, you can choose the device from this drop-down menu. Lastly, if you want to record using your computer’s sound card, select the line-in option from the drop-down menu.

Once the device is selected, load the vinyl record on the turntable, press the record button, and place the needle on the first song. Allow one side of the record to play entirely so that the audio is digitized.
If you want, you can stop the recording after one side of the LP has played, or keep recording while you load the other side of the vinyl. Afterward, you have to split the tracks anyways.
After the album has been recorded, don’t forget to save the file as a project so that it can be edited. On Audacity, click “File” >> “Save Project” >> “Save Project As…” then select the folder where you want to save the project you are working on.
Split and Edit Tracks
Up to this point, you have recorded one full album on Audacity, but it is still one track. You would want to split each track to save it as one file. This process should be relatively easy because you can go back to the beginning of the recording and see the silence between tracks. But if the type of album you recorded is live or tracks fade into each other, you would have to listen to the recording so that you know where one song begins and ends.

If the recorded album has silence between tracks, locate the first silence after the first song and click on it. Click on “Edit” >> “Clip Boundaries” >> “Split.” Doing this will separate that track from the rest of the recording. Repeat this process for all the tracks in the recording.
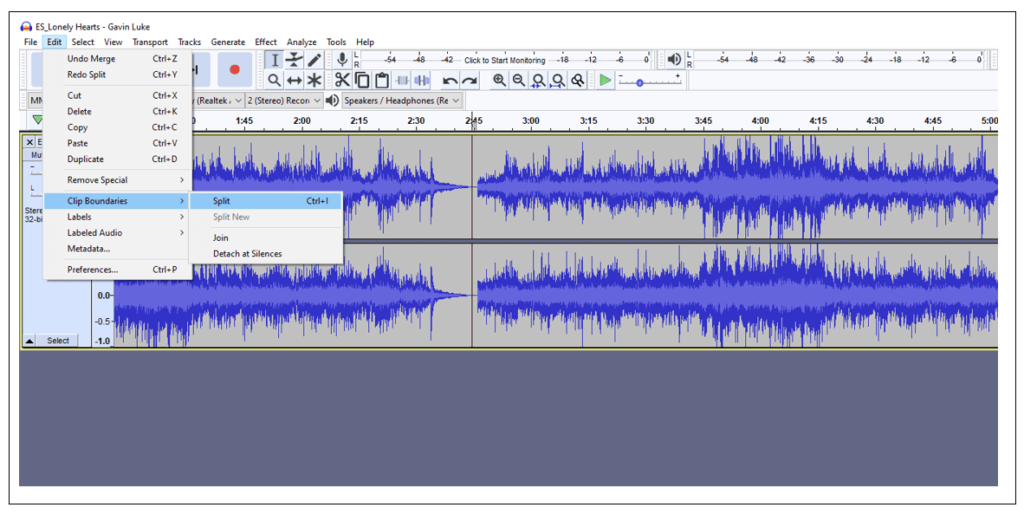
Now, double click on the first track you split and click on “Edit” >> “Copy.” Then click on “File” >> “New,” this is going open a new Audacity window. On the new window that opened, click on “Edit” >> “Paste.”
Now you can edit the track. For example, you could decrease the silence at the beginning of the first track or use some tools such as “Click Removal” to clean up the audio.
To clean up the sound of the recorded track, double-click the track to select it, then go to “Effects” >> “Click Removal.” Try different settings until you get one that you like the most, and click “Ok.”
Add Metadata to Each Track in the Album
Now that you have separated all tracks and edited them the way you want, I recommend adding metadata to each track. Digital audio files use metadata descriptions to make each track easily searchable, especially if you have a vast music library. Computers and MP3 players use this file to locate the information on each track.
In case you didn’t know, metadata, as defined by the Landr website, is the information included in audio files used to identify, label, and present audio content. Metadata provides information like artist, genre, label, song titles, album names, and track numbers.
To enter the metadata description, go to “Edit” >> “Metadata.” A new window opens, and there you have to enter all the information about the track. After entering the data for the first song, you can save it as a template so that you don’t have to reenter the same information for each track. To save as a template, click on “Save” under “Template.” On the new window that opens, choose a location where to save the template so that it can be recalled for each track of the album.

Export Digitized Tracks to MP3 or Any Other Digital Format
With Audacity, you can export a project in different digital formats, including WAV, AIFF, FLAC, MP2, MP3, and Ogg Vorbis sound files. The most popular format is MP3.
When you are ready to export your recorded tracks, double click the track to select it, go to “File” >> “Export” >> “Export Selected Audio.” On the new window that opens, name the file with the title of the song. Select the “Encoding” you want. The default is Signed 16-bit PCM; I would select Signed 24-bit PCM for better sound resolution.
Next, under “Format Options” >> “Bit Rate Mode,” make sure “Preset” is selected.
Now you need to select the audio “Quality.” When choosing the bitrate, you can select between Medium 145-185kbps, Standard 170-210kbps, Extreme 220-260kbps, and Insane 320kbps.
Just know that if you decide to use 320kbps, each audio file will be bigger in megabyte size, and if you have an extensive music library, you might need a few terabytes to store them. You could compromise a little to avoid bigger individual audio files and use the Standard or Extreme option. But if data storage is no problem for you, use Extreme 320kbps, as this will give the best audio resolution.
If you want a lossless format, choose to export the file in WAV. The rendered file will be larger than the highest quality MP3 because it’s lossless but provides the best audio quality. If you decide to export the tracks in .wav format, you will need a lot of disk space to store your vinyl collection.
After selecting the format options you want, click on “Save,” and the metadata window opens, select the saved template to load it, and edit the information as needed. Click “Ok,” and the file will be converted to whatever digital audio format you choose.
Final Thoughts
I hope this tutorial article helps you if you want to know how to convert vinyl records to MP3. That way, you can convert all your priceless vinyl collections to a digital format and take them anywhere you go. You could even store them in the cloud for easy access.
If you have any questions about this article, please contact me via the Contact Us page, and I will get back to you ASAP. Thank you for reading my blog.