There are several ways to mic a guitar amp. You can do it with one, two, or more microphones, each technique delivering a different tone.
While using a single microphone does a great job, miking a guitar amp with 2 mics allows you to capture the guitar’s full tone in more detail.
In this article, I will show you six techniques on how to mic a guitar amp that will help you get the best tone, whether you are playing live or in the recording studio.
Some techniques are as simple as using a single SM57, while others use the combination of two mics to capture the entire character of the guitar’s sound. Without further ado, let’s get started.
A Few Things to Consider Before Miking Up the Amp
Before we dive into the six techniques, there are a few important things that you should consider to get the best tone possible. Overlooking these simple tips can significantly impact the sound.
Set the EQ on the Amp to Get the Tone You Want First
The first thing you should do before placing any mic in front of the cabinet is to dial in the EQ on the guitar amp until you get the tone you want.
Remember that when miking anything, you want the source to sound as intended before placing the mic. That way, you avoid many problems when equalizing the mic placed in front of the guitar amp on the mixer side.
If you are the sound engineer, you want to have the guitarist set his preferred EQ so that the sound coming from the amp’s speaker is exactly what he wants to hear.
The reason is that trying to fix the sound later, on the mixer side, will be a headache, no matter how well you equalize it.
Watch out for Phase Cancellation When Using Multiple Mics.
Some of the techniques explained in this article use two microphones to mic the guitar amp. When using two or more mics, you need to set them so that they don’t cancel each other out.
This phenomenon is called phase cancellation, and it happens when sound waves of the same frequency don’t reach the microphone at the same time, resulting in a reduction of the signal’s amplitude.
When your phase is not lined up properly due to the mic’s positions, you’ll hear strange tonalities, and the guitar will sound null.
So, if you get a null sound, try changing the position on one of the microphones until your phase lines up and the phase cancellation goes away.
Use Your Ears to Decide the Mic’s Placement
In this article, I will be giving you techniques that you can use to mic the guitar amp but providing you with specific distances and angles between the cabinet and the mics is something you need to figure out using your ears.
The reason is that each amp is different, and the acoustics of the venue or room is also different, so giving you specific numbers is not going to work out.
Take the information provided here, use the starting points I give you, then experiment with the mic placement until you hear a tone you like.
You could also record samples from the mixer, then hear them back to figure out what sounds best.
Remember that when running a mic through a guitar amp, experimentation is key to finding a sound that you like and works for the project you are working on.
Related Article: How to Connect a Guitar Amp to a Mixer
The Mic Choice is Half of the Puzzle
When miking a guitar amp, the most important thing to consider is the type of microphone you’re using.
Experimenting with different types of microphones is recommended to find what sounds best. You can choose dynamic, condenser, or ribbon mics or combine them to get a composite sound.
Dynamic Mics are The Industry Standard
Dynamic mics are the standard for miking guitar cabinets because they are durable, directional, and deliver a warm tone characteristic of the guitar sound.
When choosing which dynamic mic to use, the Shure SM57 is practically the go-to choice for most sound engineers. Another great option is the Sennheiser MD 421-II, whose sonic characteristics deliver a precise sound reproduction of the source.
Condensers Sound Crisp and Bright
Condenser microphones are very sensitive to sound and are characterized for picking up the most subtle nuances in sound. They are usually used in recording studios or acoustically controlled environments to avoid feedback.
This doesn’t mean that you can’t use them in a live setup but be aware that feedback could be a big issue if not handled properly in live situations where the signal must be monitored and played back.
Some standard condenser mics chosen to mic a guitar amp are the AKG C414 or the Neumann U87 Ai.
Ribbon Mic Deliver Organic, Vintage Sound
Of the three types of mics, ribbons can produce warm, organic, and vintage sound. They are the most fragile, so you’ll need to be careful when handling them.
They have a figure-8 polar pattern, which means they are very sensitive to sound from the front and back but completely deaf to sound from the sides.
One of the downsides to ribbon mics is that they can’t easily isolate the source of your sound. This is not ideal in live sound situations or untreated rooms with all sorts of sound reflections.
That said, pairing up a ribbon microphone with a dynamic microphone is the best way to capture the sound from your guitar amp, as they will deliver the classic ’60s and ’70s era vintage guitar sound.
Some of the best ribbon mics to mic guitar amps are the Beyerdynamic M160 or the Royer R-121.
Related Article: 3 Ways to Connect a Bass Guitar to a Mixer or PA System
How to Mic a Guitar Amp – 6 Easy Techniques
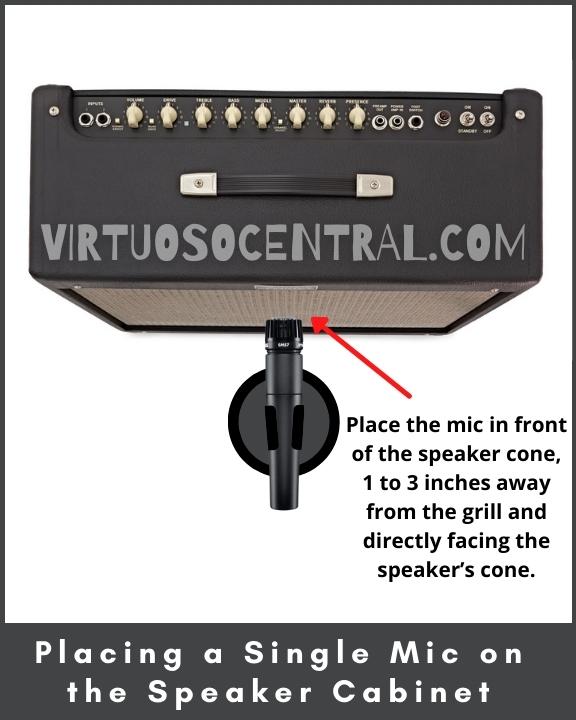
1. Placing a Single Mic on the Speaker Cabinet
This method is the easiest, and it delivers excellent results. All you have to do is mount the mic on a stand and place it in front of the speaker cone, ensuring that the mic’s head is 1 to 3 inches away from the grill and directly facing the speaker’s cone.
This single-mic guitar amp miking technique delivers a bright and present tone rich in mid and mid-high frequencies, delivering the characteristic electric guitar tone.
With this technique, where you place the microphone across the speaker will dramatically affect the tone you get, which is great because you can use this to your advantage.
For example, if you want to minimize the higher frequencies and get a fatter, warmer tone, place the mic closer to the speaker’s edge just by moving the mic stand a few inches to the left or right, always keeping the mic’s head parallel to the cone.
Another thing to consider is the angle between the mic and the speaker’s cone. Changing the mic’s position off-axis will also provide a different tone.
To angle the mic off-axis, start by placing it in front of the speaker at 90 degrees (perpendicular), then slowly angle it towards 45 degrees to locate the sweet spot where the sound is even and smooth.
You can also move the angled mic a few inches to the left or right, keeping it perpendicular to the speaker’s cone. Doing this will change the top-end response by decreasing the higher frequencies and thickening up the bottom end, providing a fuller, warmer sound.
As you can see, a single microphone gives you many options to mic your guitar amp or cabinet. I recommend that you experiment with different positions and angles until you get the tone you want.
So, in summary, if you are wondering how to mic a guitar amp with an SM57 or use a single mic method, this is the technique you need to use. Place the mic on a stand right at the center of the speaker cone with the mic’s head 1 to 3 inches away from the grille.
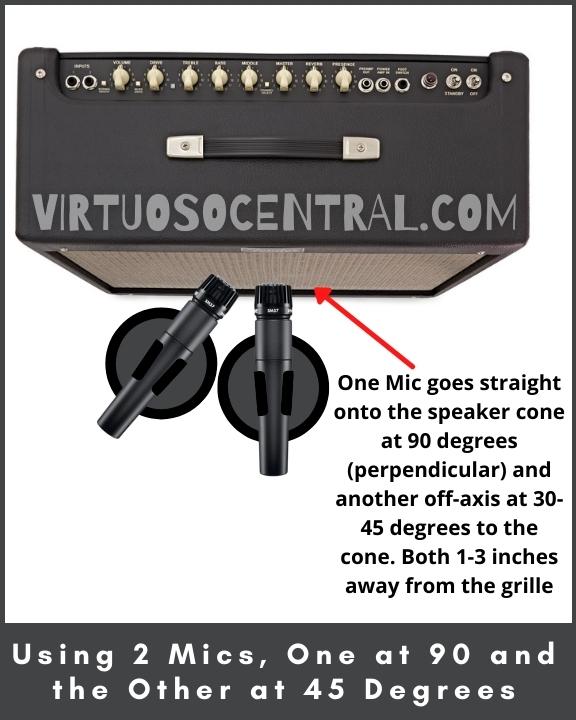
2. Using 2 Mics, One at 90 and the Other at 45 Degrees
Miking a guitar amp with 2 mics is another way of getting a killer tone. For this technique, you need to use two mics, one straight onto the speaker cone at 90 degrees (perpendicular) and another off-axis at 30-45 degrees to the cone.
In this case, you will blend these two mics on the audio mixer, resulting in a bigger, fatter composite tonal characteristic that gives you much more control.
Now that you have the two mics picking up the sound with different tonal characteristics, you can blend them at specific levels on the mixer, depending on the sound you want to achieve.
One mic will pick the mid and mid-high frequencies, while the other will pick the low-mid frequencies helping you get a more rounded tone.
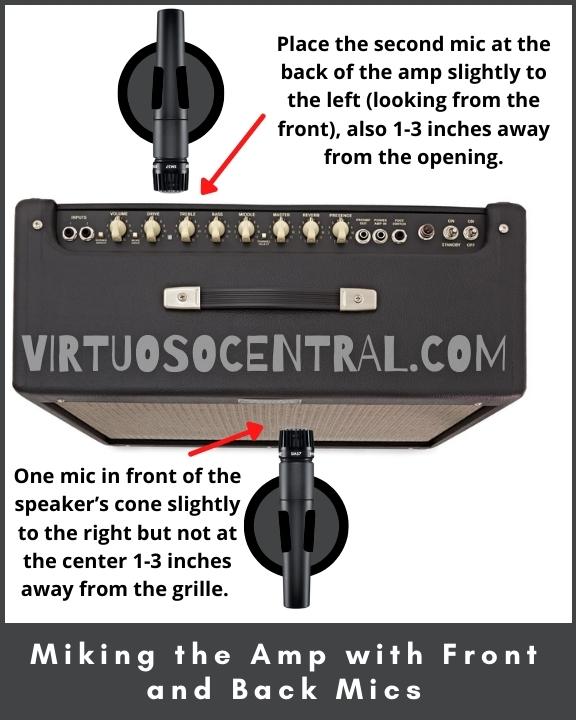
3. Miking the Amp with Front and Back Mics
If you have an open-back combo guitar cabinet, you will notice that the sound coming from the front is different than the one coming from the back.
This is because the back of the speaker is inside a resonant box and miking the back of the cabinet provides you with lower frequencies that you never get in front of the amp.
We can use this to our advantage when miking a guitar amp with 2 mics because you end up with a more rounded-off sound with a good mix of high, mid, and low frequencies.
This technique only works if you have an open-back combo guitar cabinet. In this case, place one mic in front of the speaker’s cone slightly to the right but not at the center 1-3 inches away from the grille. Then, place the second mic at the back of the amp slightly to the left (looking from the front), also 1-3 inches away from the opening.
Notice that the front and back microphones are opposite to each other. This is to avoid phase cancellation.
With this technique, you can run into microphones canceling each other out. That’s why you need to be aware of this and place the mics accordingly to avoid it.
If you run into phase cancellation problems, move the mics slightly to the left or right, or you can also angle them to hear how it affects the sound. In this case, you also need to experiment to find your tone.
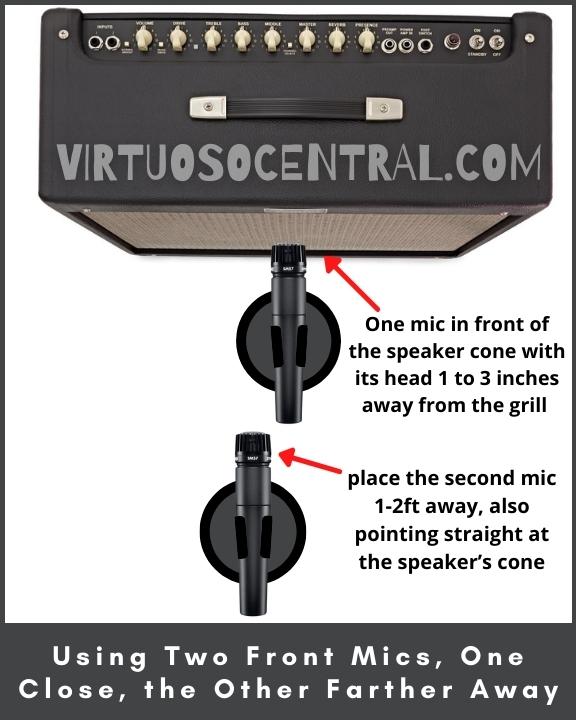
4. Using Two Front Mics, One Close, the Other Farther Away
This guitar amp miking technique aims to capture the sound at different distances.
As the speaker’s cone vibrates, it changes the air pressure around it, generating the sound we hear. As the sound waves expand and move away from the cone, their sonic characteristics change. So, a mic close to the cone will sound different from one placed some distance away.
With this miking technique, we capture both sonic characteristics and blend them in the mixing console at different levels to generate a more rounded-off sound.
This technique could be problematic on stage because having an open-to-air microphone sitting a few feet away from the sound source will capture surrounding noise and be prone to feedback.
This technique is more suited when working at a recording studio where the environment is more controlled.
But you could try this guitar amp miking technique on stage to see how your PA system reacts. You could end up with a beautiful guitar tone without getting feedback.
To use this method, you need two microphones and two stands. You have to place one microphone in front of the speaker cone with its head 1 to 3 inches away from the grill and directly facing the speaker. Then put the second mic 1-2ft away, pointing straight at the speaker’s cone.
Some adjustment you can make is to move one of the mics off-axis and see how it sounds. Also, you could move the mic closest to the speaker a bit to the sides to avoid too much brightness and capture a sound with more bottom end.
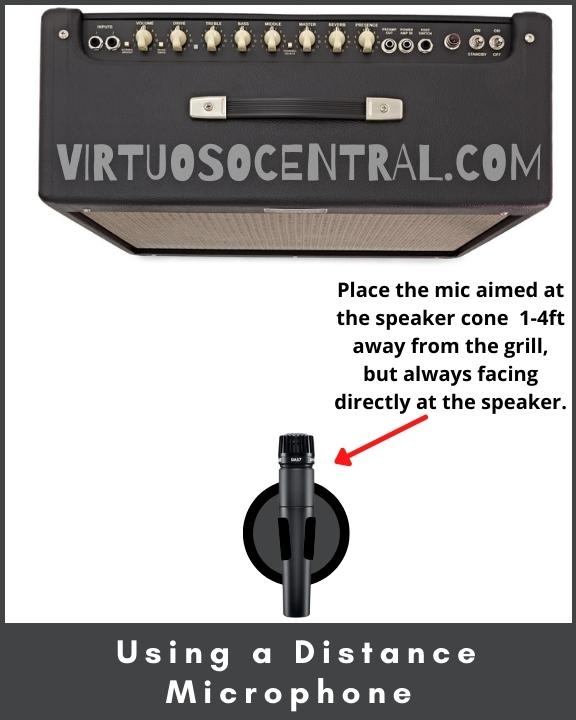
5. Using a Distance Microphone
As with the previous miking technique, this one tries to catch the sound after the sound waves have expanded in the room, letting the amp “breathe” a little before capturing the sound.
The idea behind this method is to simulate what a person would hear if they were sitting in the room while the guitarist was playing.
As the mic picks up the ambiance and the soundwave reflections from the room, you capture more depth from the performance.
To use this technique, you need one microphone and a stand. Place the mic aimed at the speaker cone and move it 1-4ft away from the grill, but always facing directly at the speaker.
If you run into problems such as sound reflections from setting the mic at the speaker level too close to the floor, you can raise the mic to capture the sound as if you were standing in the room.
Beware that this technique is for recording purposes. In live sound, this method wouldn’t work too well, and yes, you guessed it, feedback and ambient noise will be the problem.
6. The Four Mics Technique
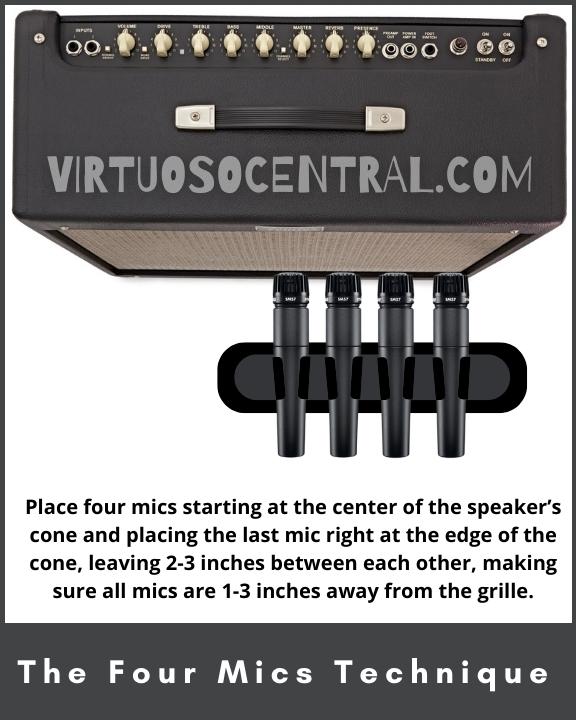
This guitar amp miking method is intended for recording and needs to be used in an acoustically controlled room such as a recording studio.
For this method, we will use four microphones. Place the first one right at the center of the speaker cone, the second a few inches to the right, the third midway between the center of the cone and the edge of the speaker, and the fourth mic at the edge of the speaker. All the mics should be 1-3 inches away from the grille.
We are doing this because we want to capture the tone at the different sections of the cone. Then all the mics can be mixed in the audio console at different levels depending on your goal.
The advantage here is that you can produce several different tonalities just by changing the level in the mixer of each microphone, giving you a lot of control over the miking process.
Related Article: How to Connect an Acoustic Guitar to an Amplifier or PA System
Conclusion
In this article, I have shown you how to mic a guitar amp using six easy techniques that will give you the best tone.
So, in summary, to mic a guitar amp using a single microphone, you can:
- Place a single mic in front of the speaker cabinet, ensuring that the mic’s head is 1 to 3 inches away from the grill and directly facing the speaker’s cone.
- Use a distance microphone aiming it at the speaker cone 1-4ft away from the grill, but always facing directly at the speaker.
For miking a guitar amp with 2 mics, you can:
- Place one mic straight onto the speaker cone at 90 degrees (perpendicular) and another off-axis at 30-45 degrees to the cone.
- Mic the amp with front and back mics, placing one mic in front of the speaker’s cone slightly to the right but not at the center, 1-3 inches away from the grille. Then, place the second mic at the back of the amp slightly to the left (looking from the front), also 1-3 inches away from the opening.
- Use two front mics, one close, the other farther away, placing one microphone in front of the speaker cone with its head 1 to 3 inches away from the grill and directly facing the speaker. Then put the second mic 1-2ft away, pointing straight at the speaker’s cone.
Lastly, to mic a guitar amp with four mics, you can:
- Place four mics starting at the center of the speaker’s cone and placing the last mic right at the edge of the cone, leaving 2-3 inches between each other, making sure all mics are 1-3 inches away from the grille.
I hope this article was helpful to you. Visit the site to explore more articles like this one by clicking here. Thank you for reading my blog.